

DeepSeek Harness
DeepSeek Harness (DSH) is the official AI agent coding environment developed by DeepSeek.
MoArk provides the official integration plugin dsh-moark, delivering native compatibility for DeepSeek Harness.
It fully supports streaming responses, tool calling, and chain-of-thought reasoning (Reasoning Content / Thinking).
Open Source Repository: gitee.com/moark/dsh-moark / github.com/oschina/dsh-moark
Prerequisites
- Verify Harness Version: DeepSeek Harness
0.2.1-rc.2or compatible0.2.xversions. - Runtime Environment: Ensure DeepSeek Harness Desktop is installed, or DSH Web / CLI can be executed.
- Obtain an Access Token: Go to Workbench -> Settings -> Access Tokens to generate or copy an access token. Creating a dedicated token for this plugin is recommended.
- Resource Quota: Ensure your account holds sufficient active resource package balance, or that your access token is granted permissions for the desired models.
Plugin Installation
- Desktop In-App Installation (Recommended)
- CLI Installation
- DSH Web / npx
- Open the DeepSeek Harness Desktop client.
- Click the
Pluginsmenu in the left navigation bar. - Click "+ Add Plugin", enter the npm package name
dsh-moark, and confirm the installation.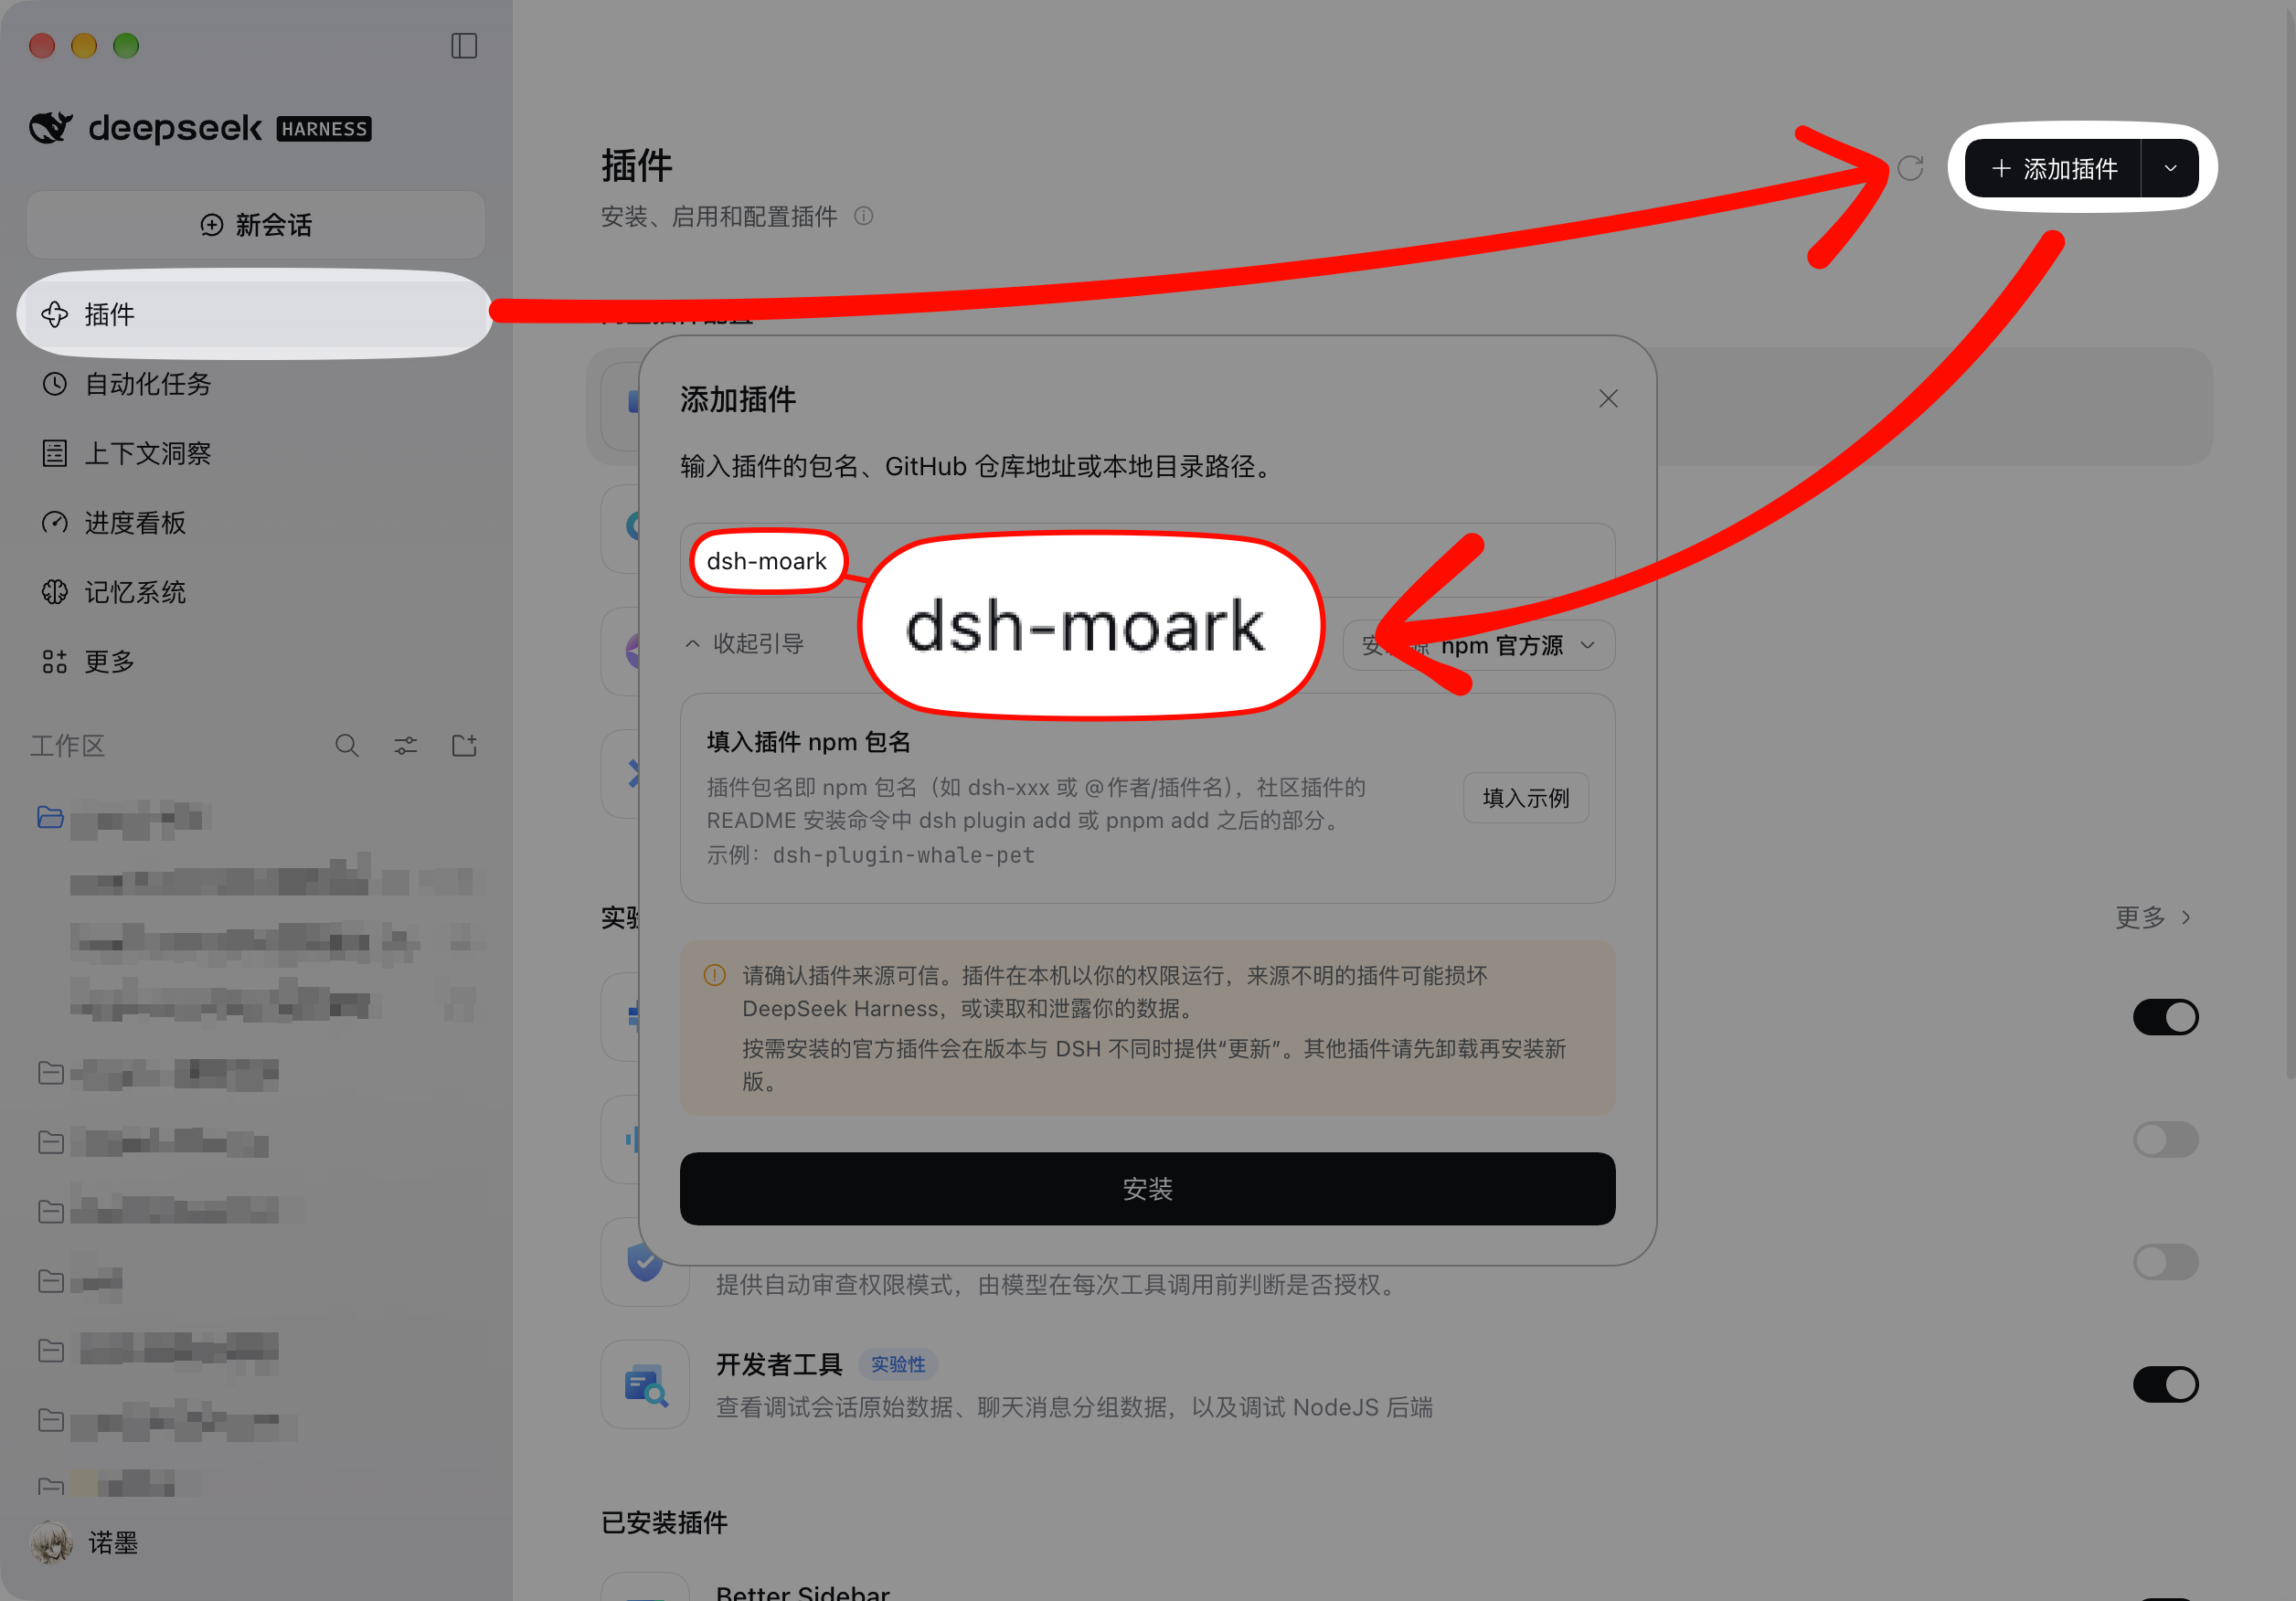
When running DeepSeek Harness Desktop, prefer installing via the in-app "Plugins" panel. If using the CLI, ensure DeepSeek Harness Desktop is completely exited first.
If you prefer managing plugins via the terminal, execute the following command after fully exiting the desktop application:
dsh plugin --profile desktop add dsh-moark
DSH Web uses a dedicated web profile and must be installed separately from Desktop.
Install the plugin:
dsh plugin --profile web add dsh-moark
If the dsh command is not available globally, execute it via npx:
npx @deepseek-ai/dsh plugin --profile web add dsh-moark
If Web is already running, you can also search and install it directly in the left Plugins panel; restart the Web process after installation.
Start DSH Web:
dsh web
Or:
npx @deepseek-ai/dsh web
Open the web address printed in your terminal, then navigate to Settings → 模力方舟 · MoArk. If Web was already running prior to installation, restart the Web process once.
After installation, the 模力方舟 · MoArk settings entry will appear in the DeepSeek Harness settings sidebar.
Onboarding Guide
- Plugin Onboarding (Recommended)
- Manual Configuration (Without Plugin)
Configure Service Region and Access Token
In DeepSeek Harness, click Settings in the left navigation → 模力方舟 · MoArk, and click "Onboard / Update" at the top to open the connection modal. Configure the Endpoint and Access Token.
- The plugin currently supports the following service endpoints:
- Domestic:
https://api.moark.com/v1 - Overseas:
https://api.moark.ai/v1(Default for overseas users) - Custom endpoint: Any OpenAI-compatible API endpoint supporting
/chat/completionsand/models
- Domestic:
- Access Token: Paste your access token obtained from the MoArk console.

Discover and Select Models
- High-performance coding models (such as
qwen3.8-flash,deepseek-v4.1-flash, etc.) are pre-selected by default. - Click "Fetch Models" in the toolbar, and the plugin will dynamically retrieve all text chat models accessible by your token.
- Click any model card to toggle its enabled status. Select "Set as Default" at the bottom of your preferred card to make it the default model for new sessions.
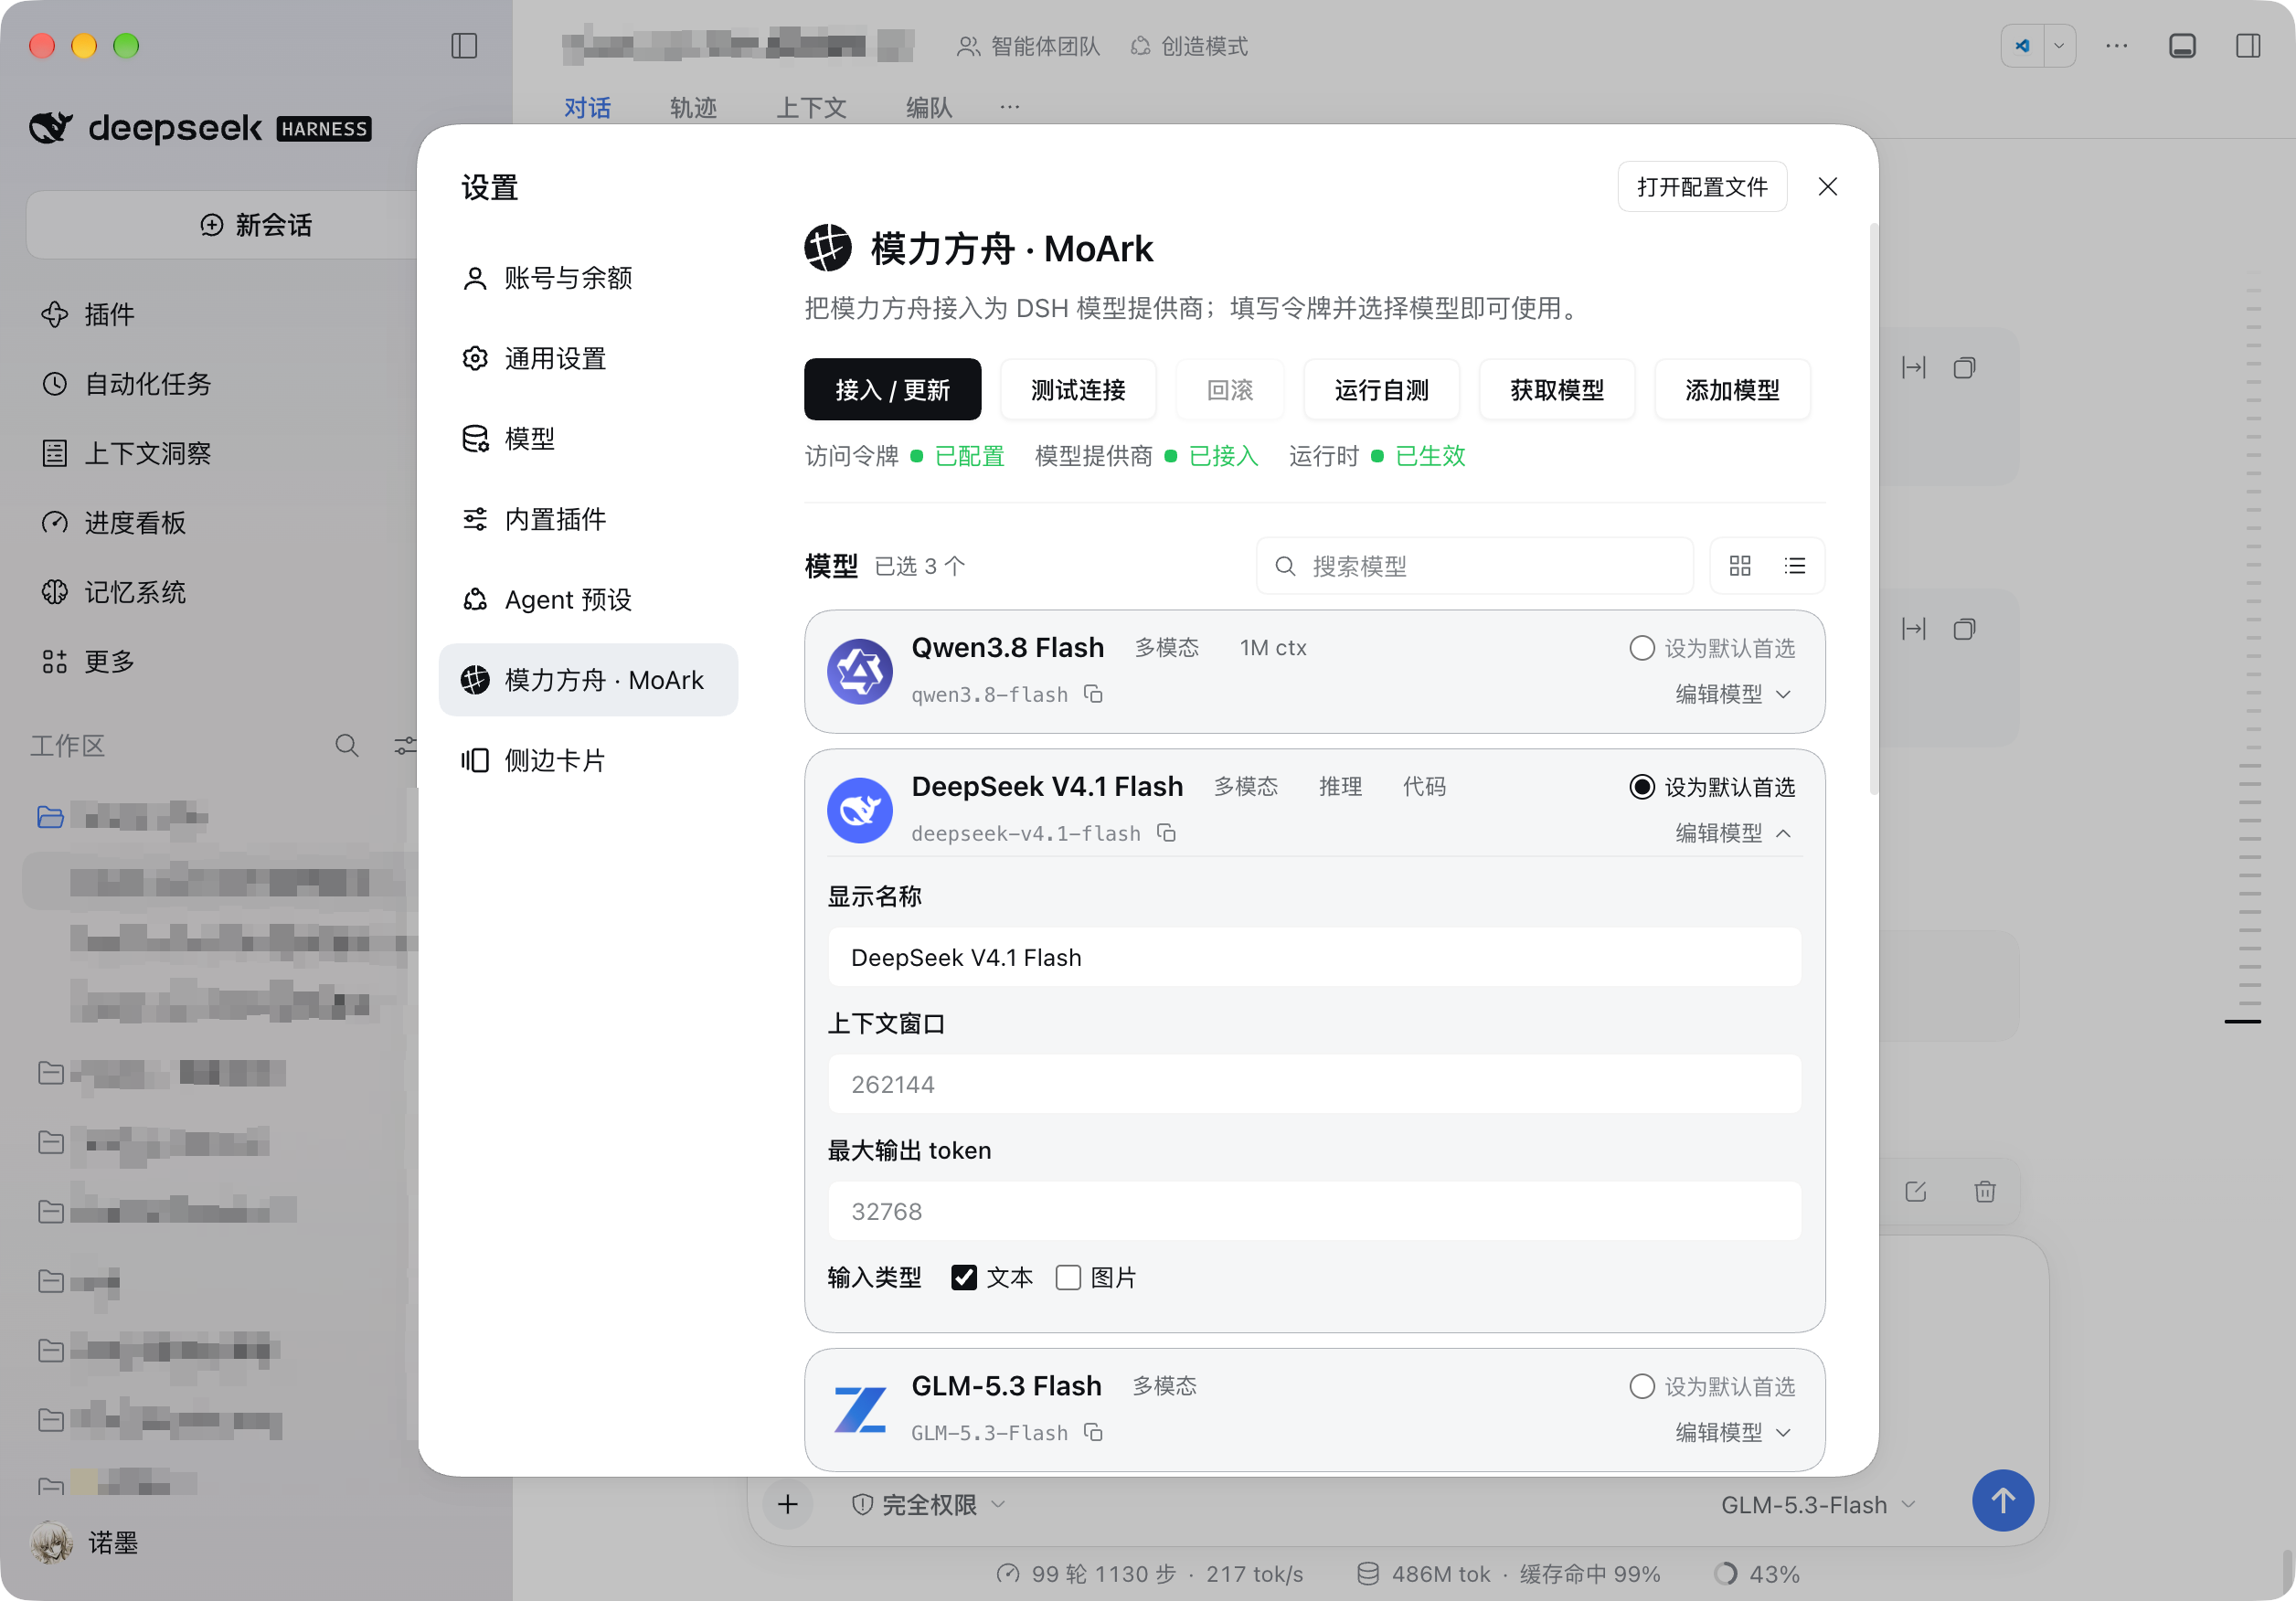
Test Connection & Save
- Click "Test Connection" to verify network connectivity and token validity.
- Click "Onboard / Update" to save. The plugin securely stores credentials, merges the route safely into Harness, and runs an end-to-end streaming self-test.
If you prefer to configure Harness manually without installing the plugin:
- Click "Settings" in the left navigation of DeepSeek Harness →
Models. - Add a custom Provider and configure the following fields:
| Field | Description |
|---|---|
| Provider Name | MoArk or 模力方舟 (MoArk) |
| API Protocol | openai-completions |
| Base URL (Domestic) | https://api.moark.com/v1 |
| Base URL (Overseas) | https://api.moark.ai/v1 |
| API Key / Credential | Set MOARK_API_KEY in Harness credentials (or enter access token directly) |
| Model List | Manually add desired model IDs (e.g., qwen3.8-flash, deepseek-v4.1-flash, etc.) |
After saving, return to the conversation, switch the model selector to MoArk and your selected model, and begin coding.
Troubleshooting
1. 401 / Invalid Token
- Check your access token status under Workbench -> Settings -> Access Tokens.
- Ensure no accidental leading or trailing whitespace was copied.
2. 400 Resource Package or Quota Error
- Verify that your account has an active resource package with remaining balance.
- If using a restricted access token, ensure it has been granted permissions for the target model.
3. Model List is Empty
- Verify that your access token is authorized for at least one text chat model;
- Click "Fetch Models" on the page to retrieve models again;
- Check if your network can reach the selected Base URL.
4. How to Roll Back Configuration
- The plugin automatically saves a snapshot before writing changes. In
Settings→模力方舟 · MoArk, click "Rollback" in the toolbar to restore the configuration to its pre-onboarding snapshot.
Uninstallation
- Roll Back Route: Before uninstalling the plugin, click "Rollback" in the plugin settings page to cleanly remove the merged provider route.
- Uninstall Plugin:
- Desktop UI: Open Plugins in the left navigation, find
dsh-moark, and click Uninstall; - Desktop CLI: Exit the desktop client and run
dsh plugin --profile desktop remove dsh-moark; - Web / npx: Stop the Web process and run
dsh plugin --profile web remove dsh-moark(ornpx @deepseek-ai/dsh plugin --profile web remove dsh-moark).
- Desktop UI: Open Plugins in the left navigation, find
- Clean Up Credentials: Rolling back does not delete saved access tokens. To completely revoke access, delete or revoke the token in the MoArk console, and remove
MOARK_API_KEYfrom Harness credentials.
 京公网安备11011502039387号