Object Detection and Description
MoArk provides image annotation capabilities through the Florence-2-large model.
Florence-2-large is an open-source multi-functional image annotation model developed by Microsoft, which can assist in annotating image content, generating image descriptions, identifying objects, etc. Thanks to its large model architecture, Florence-2 also supports using prompts to directionally annotate specific objects in images.
This model only supports English for input and output. Therefore, both the input prompts, the recognized content, and the output results will be in English. Any information in other languages may cause unpredictable output results from the model.
The following describes how to use the Florence-2-large model for image annotation in code.
Preparation
First, obtain your access token, then define the request function as follows.
The use of the interface is illustrated with Python code. The following will separately demonstrate the usage methods of the two functions: "image description" and "object recognition". Before starting, define the request function as follows:
import requests

headers = {
    "Authorization": "Bearer <your api token>",
}

# URL for requesting image descriptions
url_caption = "https://api.moark.ai/v1/images/caption"
# URL for requesting object recognition
url_object_detection = "https://api.moark.ai/v1/images/object-detection"

def query(url, payload):
	files = {
		"image": (payload["image"], open(payload["image"], "rb"))
	}
	data = {key: payload[key] for key in payload if key not in files}
	response = requests.post(url, headers=headers, files=files, data=data)
	return response.json()
The following image is used as an example:

1. Image Description Generation
This function can obtain a natural language description of the image input by the user.
Using the query function above, send a request as follows:
output = query(url_caption, {
    "model": "Florence-2-large",
    "image": "path/to/image.jpg",
    "caption_level": 0
})
Explanation of request parameters:
image: The image to be described, only one image is supported as input.caption_level: The level of detail required for the image description. Supports three levels: 0, 1, and 2. The higher the level, the more detailed the description and the more words in the output. The level can be adjusted based on needs. If not specified, the default level 0 is used.
When caption_level=0 is set, the output is as follows:
A woman and a little girl walking down a dirt road.
When caption_level=1 is set, the output is as follows:
The image shows a woman and a little girl walking down a dirt road, hand in hand, with a horse in the background. The sky is filled with clouds and the ground is covered with lush green grass. The image is animated, giving it a whimsical feel.
When caption_level=2 is set, the output is as follows:
The image is an illustration of a mother and daughter walking hand in hand in a field. The mother is wearing a long white dress with pink flowers on it and has long blonde hair. She is holding the hand of the daughter, who is also wearing a purple dress. They are both smiling and appear to be enjoying each other's company. In the background, there is a fence with wooden posts and a horse grazing on the grass. The sky is filled with fluffy white clouds and the sun is shining brightly, creating a warm glow. The field is covered in yellow flowers and there are hills in the distance. The overall mood of the image is peaceful and serene.
As the caption_level increases, the model produces a longer and more detailed description. Choose the level that matches your scenario.
2. Object Recognition
This function can obtain the label and position information of the main subject target in the input image.
Unlike traditional object recognition, the large-model approach does not return label confidence scores—each result is deterministic. You can provide an optional prompt parameter to guide the labels and obtain more descriptive outputs without predefining labels in advance.
Distinguished by whether prompt is input, this function can be divided into "traditional object recognition" and "instruction-based object recognition".
2.1 Traditional Object Recognition
This recognition method is similar to traditional object recognition tasks, which can return labels and the coordinates of object rectangles. The request code based on this method is as follows:
The code uses only two parameters: image and caption_level:
image: The image to be described, only one image is supported as input.caption_level: The level of detail required for the image description. Supports three levels: 0, 1, and 2. The higher the level, the more detailed the description and the more words in the output. The level can be adjusted based on needs. If not specified, the default level 0 is used.
Use the following request code:
output = query({
    "model": "Florence-2-large",
    "image": "path/to/image.jpg",
    "caption_level": 0
})
The request result format is as follows:
{
	"num_objects": int,
	"objects":[
		{
			"label": str,
			"bbox": [x1, y1, x2, y2]
		}, ...
	]
}
The response is JSON with the following fields:
num_objects: The number of objects detected in the image.objects: An array of objects, each object contains the label and position of a target.label: The label information of the target.bbox: The position of the target, which is a quadruplet, can be grouped into(x1,y1), (x2,y2)pairs, representing the coordinates of the top-left and bottom-right corners of the rectangle. We use the same example image.
When caption_level=0 is set, the output is as follows:
{
  "num_objects": 5,
  "objects": [
    {
      "label": "animal",
      "bbox": [
        58.880001068115234, 598.3999633789062, 201.21600341796875,
        748.1599731445312
      ]
    },
    {
      "label": "girl",
      "bbox": [
        321.0240173339844, 914.5599975585938, 478.72003173828125,
        1203.8399658203125
      ]
    },
    {
      "label": "human face",
      "bbox": [
        501.2480163574219, 753.2799682617188, 545.280029296875,
        795.5199584960938
      ]
    },
    {
      "label": "human face",
      "bbox": [
        379.39202880859375, 929.9199829101562, 414.2080078125, 977.2799682617188
      ]
    },
    {
      "label": "woman",
      "bbox": [
        427.52001953125, 700.7999877929688, 804.35205078125, 1238.4000244140625
      ]
    }
  ]
}
When caption_level=1 is set, the output is as follows:
{
  "num_objects": 4,
  "objects": [
    {
      "label": "girl in white dress with pink flowers in field at sunset",
      "bbox": [
        427.52001953125, 700.7999877929688, 805.3760375976562,
        1238.4000244140625
      ]
    },
    {
      "label": "girl with red hair and blue dress in field with wooden fence",
      "bbox": [
        311.8080139160156, 914.5599975585938, 479.7440185546875,
        1203.8399658203125
      ]
    },
    {
      "label": "brown horse with blonde mane and tail in field",
      "bbox": [
        58.880001068115234, 598.3999633789062, 201.21600341796875,
        748.1599731445312
      ]
    },
    {
      "label": "human face",
      "bbox": [
        501.2480163574219, 753.2799682617188, 545.280029296875,
        795.5199584960938
      ]
    }
  ]
}
It is worth noting that setting different caption_level may lead to 完全不同 recognition results.
In the above results,<u> level 0 recognizes more objects than level 1 </u> , and the description of objects recognized at level 1 is more detailed than that at level 0.
This is because the higher the level, the more detailed the description, and the model is more inclined to find complex objects. The description of objects at level 1 is more complex and of higher quality. In other words, the lower the level, the model is more inclined to choose simple targets, and the description is more concise. As a result, there are more objects in the results. Therefore, you can choose the appropriate parameters based on this experience for target recognition.
2.2 Instruction-based Object Recognition
This function inputs a picture in the request and also inputs a prompt word.
The model will extract words related to the image content in prompt as label results for object recognition. As follows, we wrote beautiful girl in the image in the prompt, and the model will recognize the beautiful girl in the image and return the label and target position.
Note that if the prompt parameter is used, the caption_level parameter will be invalid, and the detail level of the label content will be determined by the prompt.
output = query(url_onject_detection, {
    "model": "Florence-2-large",
    "image": "path/to/image.jpg",
    "prompt": "beautiful girl in the image"
})
Explanation of request parameters:
image: The image to be described, only one image is supported as input.prompt: Auxiliary prompt words.
Response example:
{
  "num_objects": 2,
  "objects": [
    {
      "label": "beautiful girl",
      "bbox": [
        433.6640319824219, 702.0799560546875, 806.4000244140625,
        1239.679931640625
      ]
    },
    {
      "label": "beautiful girl",
      "bbox": [
        317.9520263671875, 913.2799682617188, 479.7440185546875, 1208.9599609375
      ]
    }
  ]
}
It can be seen from the request results that the model found that the semantics of beautiful girl in prompt are similar to the two girls in the picture. Therefore, the model recognized these two targets, gave the bbox target position, and used the words or short sentences in our prompt as the label.
This function is suitable for when you want to mark a specific subject object in the picture. The model will use the words in our prompt as label for the specific marked object.
Secretly tell you that we found that popular film, television and animation character models can also be recognized (we tried "Star Wars" and "One Piece"). You can try it~
3. Post-processing of Label Results
After obtaining the labels through object recognition, in order to better see the marking effect, we provide a function for drawing results for reference. The code is as follows:
from PIL import Image, ImageDraw, ImageFont

def draw_labelled_bbox(image, bbox, label):
    draw = ImageDraw.Draw(image)

    # Set font
    font_size = 16  # Initial font size
    try:
        font = ImageFont.truetype("arial.ttf", font_size)  # Use system font
    except IOError:
        font = ImageFont.load_default()  # If no font file, use default font

    draw.rectangle(bbox, outline="red", width=3)
    x1, y1, x2, y2 = bbox
    max_width = x2 - x1

    words = label.split()
    text_lines = []
    current_line = ""

    for word in words:
        test_line = f"{current_line} {word}".strip()
        line_width = draw.textlength(test_line, font=font)
        if line_width <= max_width:
            current_line = test_line
        else:
            text_lines.append(current_line)
            current_line = word
    if current_line:
        text_lines.append(current_line)

    line_height = font.getbbox("A")[3] - font.getbbox("A")[1]
    label_height = line_height * len(text_lines) + 4
    label_box = [x1, y1 - label_height, x2, y1]

    draw.rectangle(label_box, fill="red")
    text_y = y1 - label_height + 2
    for line in text_lines:
        draw.text((x1 + 2, text_y), line, fill="white", font=font)
        text_y += line_height

    return image


# Example parameters
image = Image.open("/path/to/your/image.jpg")
bbox = [148, 276, 290, 653]
label = "put your label here"

# Call function
image = draw_labelled_bbox(image, bbox, label)

# Display and save
image.show()
image.save("/path/to/save.jpg")
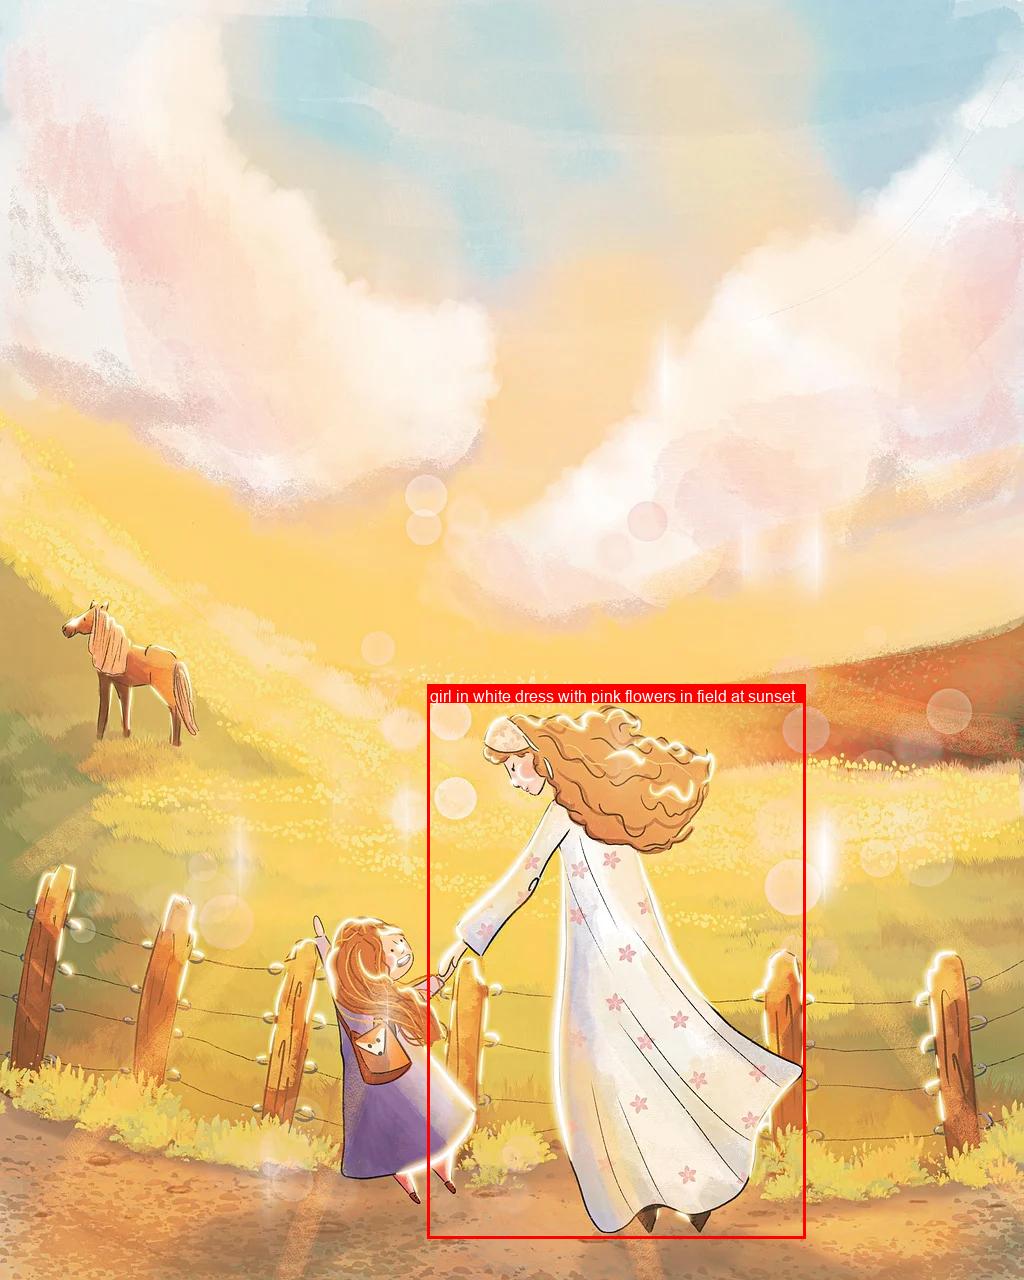
Take the example image and the specific label result obj as an example:
{
  "label": "girl in white dress with pink flowers in field at sunset",
  "bbox": [
    433.6640319824219, 702.0799560546875, 806.4000244140625, 1239.679931640625
  ]
}
Convert the result to a dict class in python, and we call the function with the following code:
image = loaded_image
label = obj['label']
bbox = obj['bbox']

image = draw_labelled_bbox(image, bbox, label)
image.show()
The annotation result can be obtained as shown in the following figure:
The example code contains comments related to fonts and calls, which you can modify according to your needs.
The above is the entire tutorial, wish you a pleasant calling experience!