

Quick Start
Welcome to PocketClaw! This guide will help you complete the device setup in just a few minutes and start your AI agent journey.
The entire setup process takes approximately 5-10 minutes. Please follow the steps below.
Step 1: Network Pairing
This tutorial will guide you through configuring PocketClaw's network using a computer or phone.
1.1 Wait for Device to Boot
Use the included power cable to connect the device and power it on.
- Pay attention to the cable orientation to avoid inserting it incorrectly
- The Type-C end connects to PocketClaw's power input port
- The other USB end can connect to a charger, power bank, or computer for power supply only. Some laptop USB ports may not provide sufficient power. If PocketClaw's power supply voltage is insufficient, it may fail to detect the hotspot. We recommend using a wall charger for power
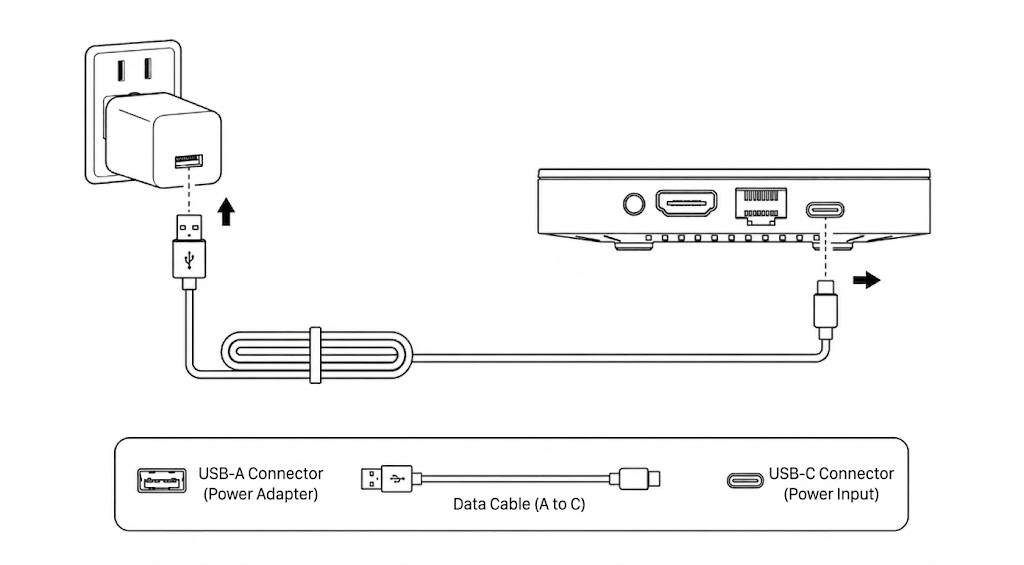
- Red light on + Blue light blinking = Device is starting up
- First boot takes 1-2 minutes to complete initialization
If the red light stays solid and the blue light never blinks after powering on, the device may have an issue. Do not repeatedly power cycle the device. Please contact us for after-sales support, or scan the QR code to join the official support group.
PocketClaw's system software is pre-installed on the TF card. To ensure proper device operation, do not modify, delete, or overwrite any files on the TF card. If you have special requirements, please contact us for support.
1.2 Connect to Device Hotspot
After the device boots, it will automatically create a WiFi hotspot. Follow these steps:
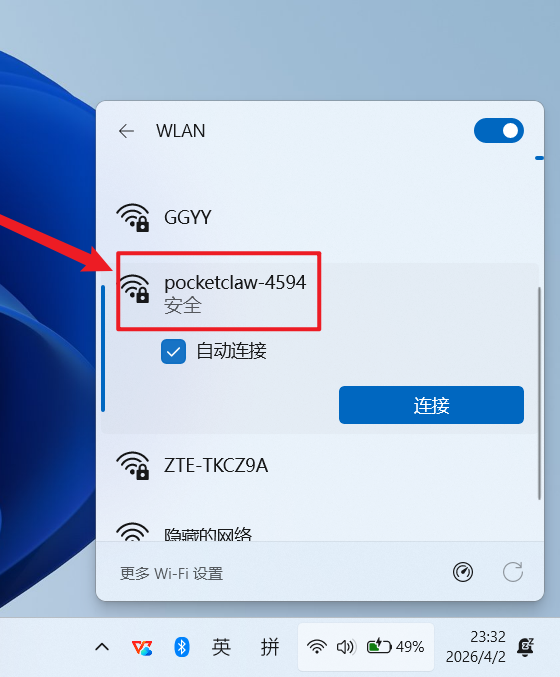
Open WiFi settings on your phone or computer and find the following network:
| Item | Value |
|---|---|
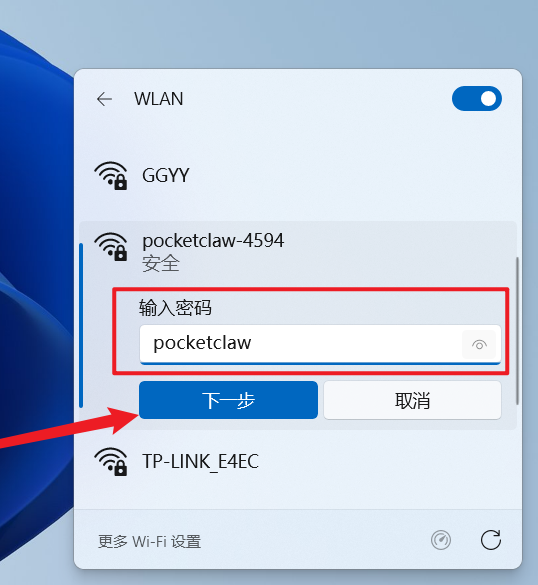
| WiFi Name | POCKETCLAW-xxx (xxx is the device's unique ID) |
| WiFi Password | pocketclaw |
- The PocketClaw hotspot remains active to facilitate initial network setup or future reconfiguration
- The hotspot may briefly disconnect while PocketClaw connects to the target WiFi
- Whether setting up for the first time or changing the WiFi PocketClaw connects to, you can reconnect to this hotspot for configuration
- We recommend using a phone or computer to connect to the hotspot and keeping the device close to PocketClaw for stable pairing
| Find WiFi | Enter Password |
|---|---|
 |  |
Can't find PocketClaw's WiFi?
- Wait for device initialization: The device takes 1-2 minutes to boot on first power-on. Wait a bit longer and refresh the Wi-Fi list
- Restart the device: If there's a power issue, disconnect and reconnect power, then wait for the hotspot to broadcast again
- Contact support: If the above steps don't work, please contact customer support for assistance, or scan the QR code to join the official support group
1.3 Configure Network Connection
After successfully connecting to the device hotspot, follow these steps to complete the initial network setup:
- Open a browser and visit
http://pocketclaw.local - If that doesn't work, visit
http://192.168.4.1 - On the network configuration page, select your target WiFi and enter the correct password
- Click "Connect WiFi" and wait for the device to complete the connection
PocketClaw WiFi Configuration Page
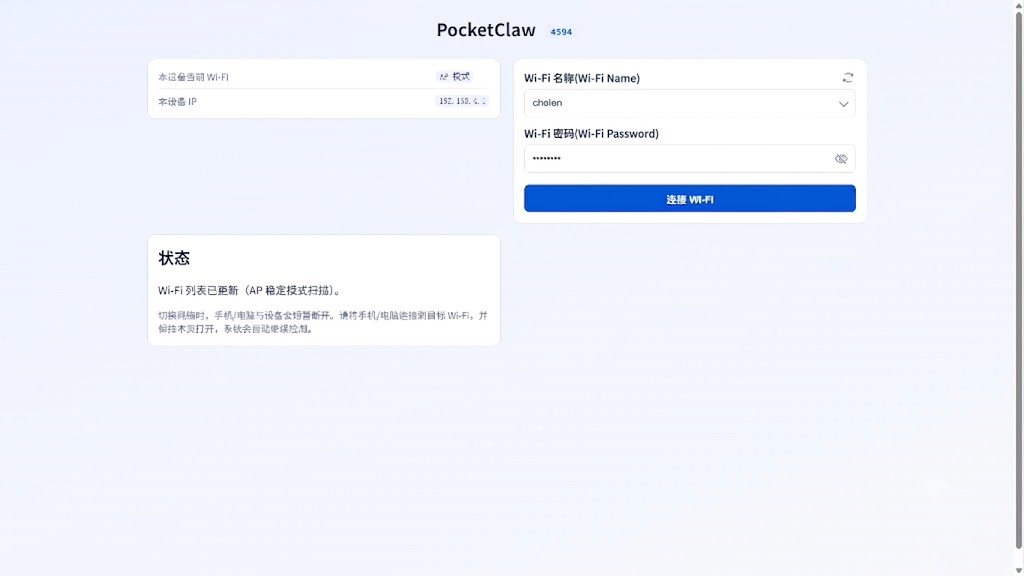
- On the configuration page, click the "Wi-Fi Name" dropdown and select the same WiFi network that your phone/computer will later connect to on the same local network
- Enter the corresponding WiFi password, then click "Connect WiFi"
- The connection process takes 30-60 seconds. Do not close the page, switch networks, or refresh the browser during this time
Reconnect your phone or computer to the PocketClaw hotspot, go to http://pocketclaw.local or http://192.168.4.1 again, reselect the WiFi and enter the correct password.
- After a successful connection, the page will display the
Current Wi-Fi IPandPocketClaw Address. Please note thePocketClaw Addressas a backup.
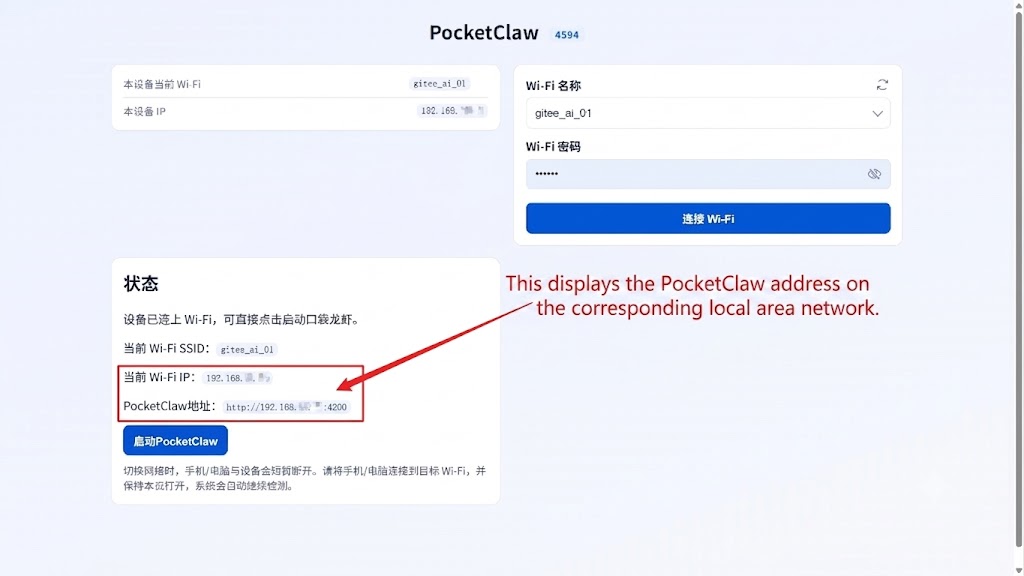
- While connecting to the target WiFi, the PocketClaw hotspot will briefly disconnect. Your phone or computer may automatically switch to another WiFi
- If your phone or computer switches to the same WiFi that PocketClaw is connecting to, the page will automatically redirect to PocketClaw's chat page
- If your phone or computer switches to a different WiFi, the page won't auto-redirect. In this case, manually switch your phone or computer to the same WiFi as PocketClaw
- Switch your phone or computer's WiFi to match PocketClaw's WiFi, then open a browser and enter
http://pocketclaw.local:4200to access the device.
http://pocketclaw.local:4200 is inaccessibleEnter the PocketClaw Address you noted earlier from the network configuration page. If you don't know the address, follow these steps to find it:
- Reconnect to the PocketClaw hotspot
POCKETCLAW-xxx - Open a new browser tab and visit
http://pocketclaw.local - If that address doesn't work, visit
http://192.168.4.1 - After entering the network configuration page, PocketClaw should already be in a WiFi-connected state
- Check and note the
Current Wi-Fi IPandPocketClaw Addresson the page. It usually starts with 192.168.x.x, but the actual address shown on the page prevails - Switch your phone or computer to the same WiFi as PocketClaw
- Open a browser and enter the
PocketClaw Addressyou just noted
1.4 Change PocketClaw's WiFi
Changing PocketClaw's connected WiFi follows essentially the same logic as the initial setup. The key point: after PocketClaw switches to the new WiFi, your phone or computer must also switch to the same new WiFi to continue accessing the device.
- On your phone or computer, reconnect to PocketClaw's hotspot
POCKETCLAW-xxx - Enter the hotspot password
pocketclaw - Open a browser and visit
http://pocketclaw.local - If that address doesn't work, use
http://192.168.4.1 - On the network configuration page, select the new WiFi and enter the corresponding password
- Click "Connect WiFi" and wait for the connection to succeed
- After success, don't disconnect immediately. First check the
Current Wi-Fi IPandPocketClaw Addressdisplayed on the page, and note the PocketClaw Address as a backup - Switch your phone or computer to the same new WiFi as PocketClaw
- After switching to the same local network, first try
http://pocketclaw.local:4200 - If that address is inaccessible, use the PocketClaw Address you noted earlier
- After changing WiFi, PocketClaw will switch from the old network to the new one
- If your phone or computer is still on the old network, you won't be able to access PocketClaw. Please switch your phone or computer to the same WiFi network as PocketClaw
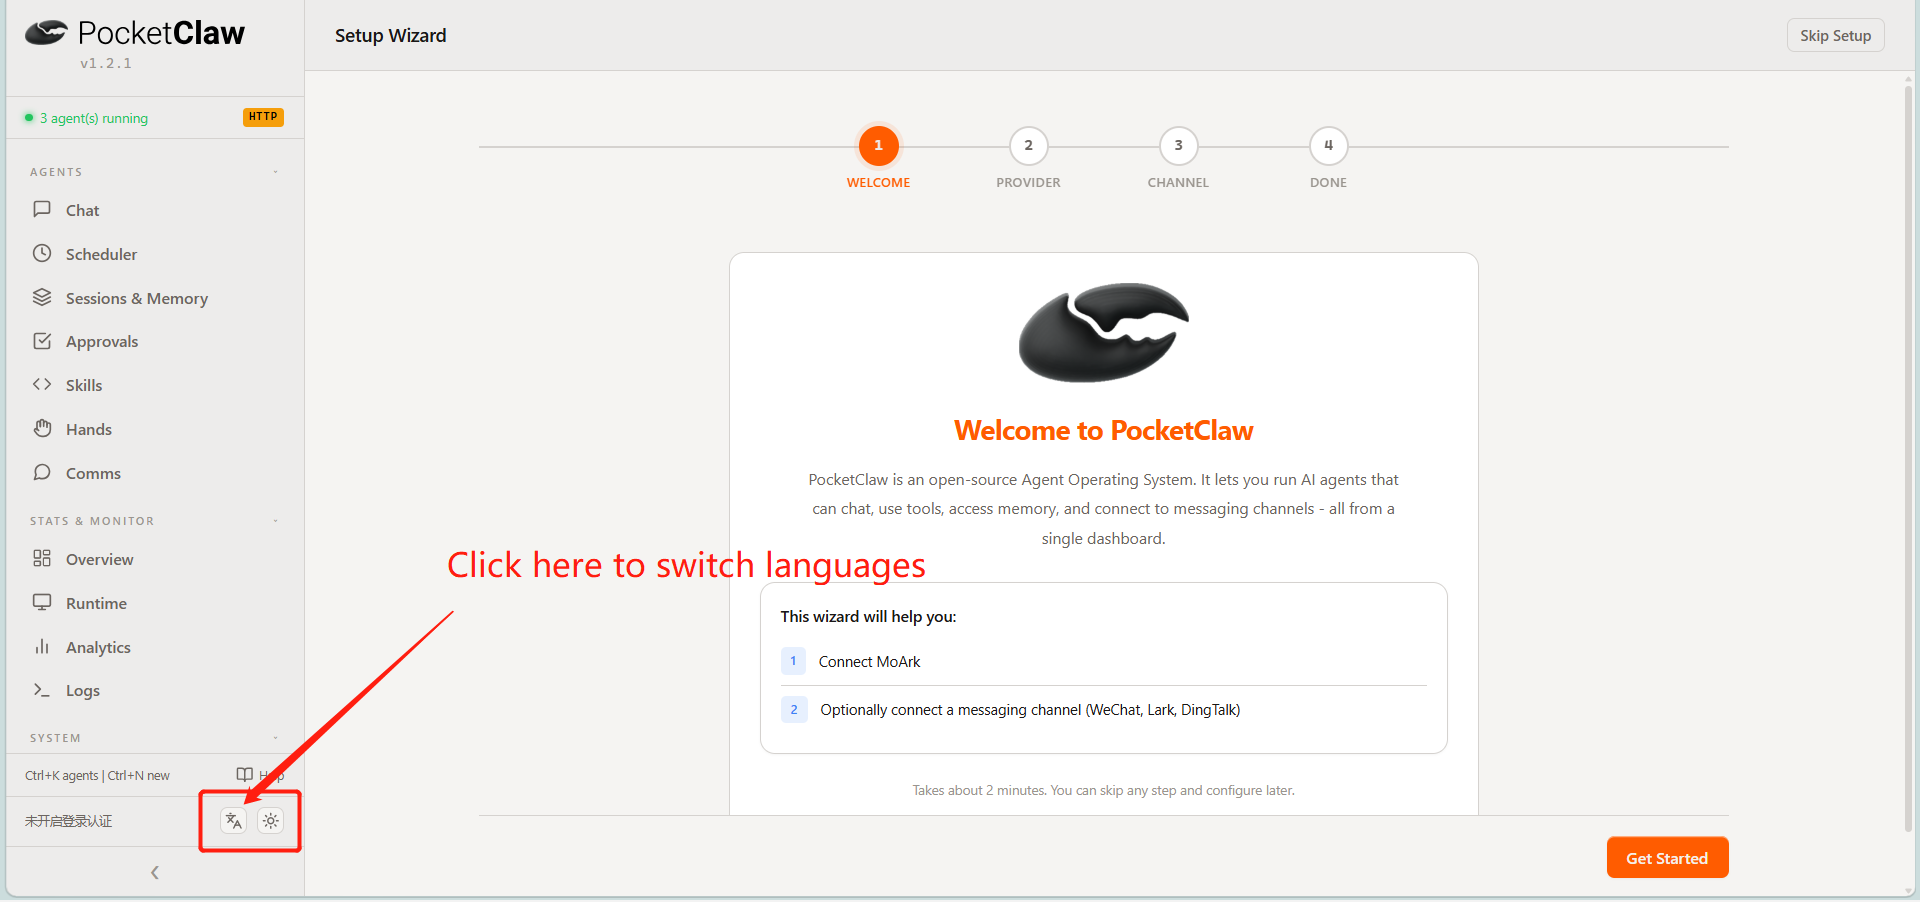
After successful access, you will enter PocketClaw's wizard page
Troubleshooting
If you encounter difficulties during pairing, try these methods
- Backup address: Enter
http://192.168.4.1and retry - WiFi list is empty: Click the refresh button next to the list to rescan available networks
- Target WiFi not found: Confirm other devices can connect to the WiFi and check the network environment
- No response after entering password:
- Wrong password: Reconnect your phone or computer to the PocketClaw hotspot, reopen
http://pocketclaw.localorhttp://192.168.4.1, reselect the WiFi and enter the correct password - Correct password but no redirect: Log into the WiFi router's admin panel to check the device IP
- Wrong password: Reconnect your phone or computer to the PocketClaw hotspot, reopen
If none of these work, please contact customer support for technical assistance. We will help you complete the device setup, or scan the QR code to join the official support group.
Step 2: Get MoArk Access Token
PocketClaw needs to work with the MoArk platform. After completing network configuration, you need to obtain an access token (API KEY).
PocketClaw purchasers will receive a 200 CNY voucher sent via email.
2.1 Enter MoArk Dashboard
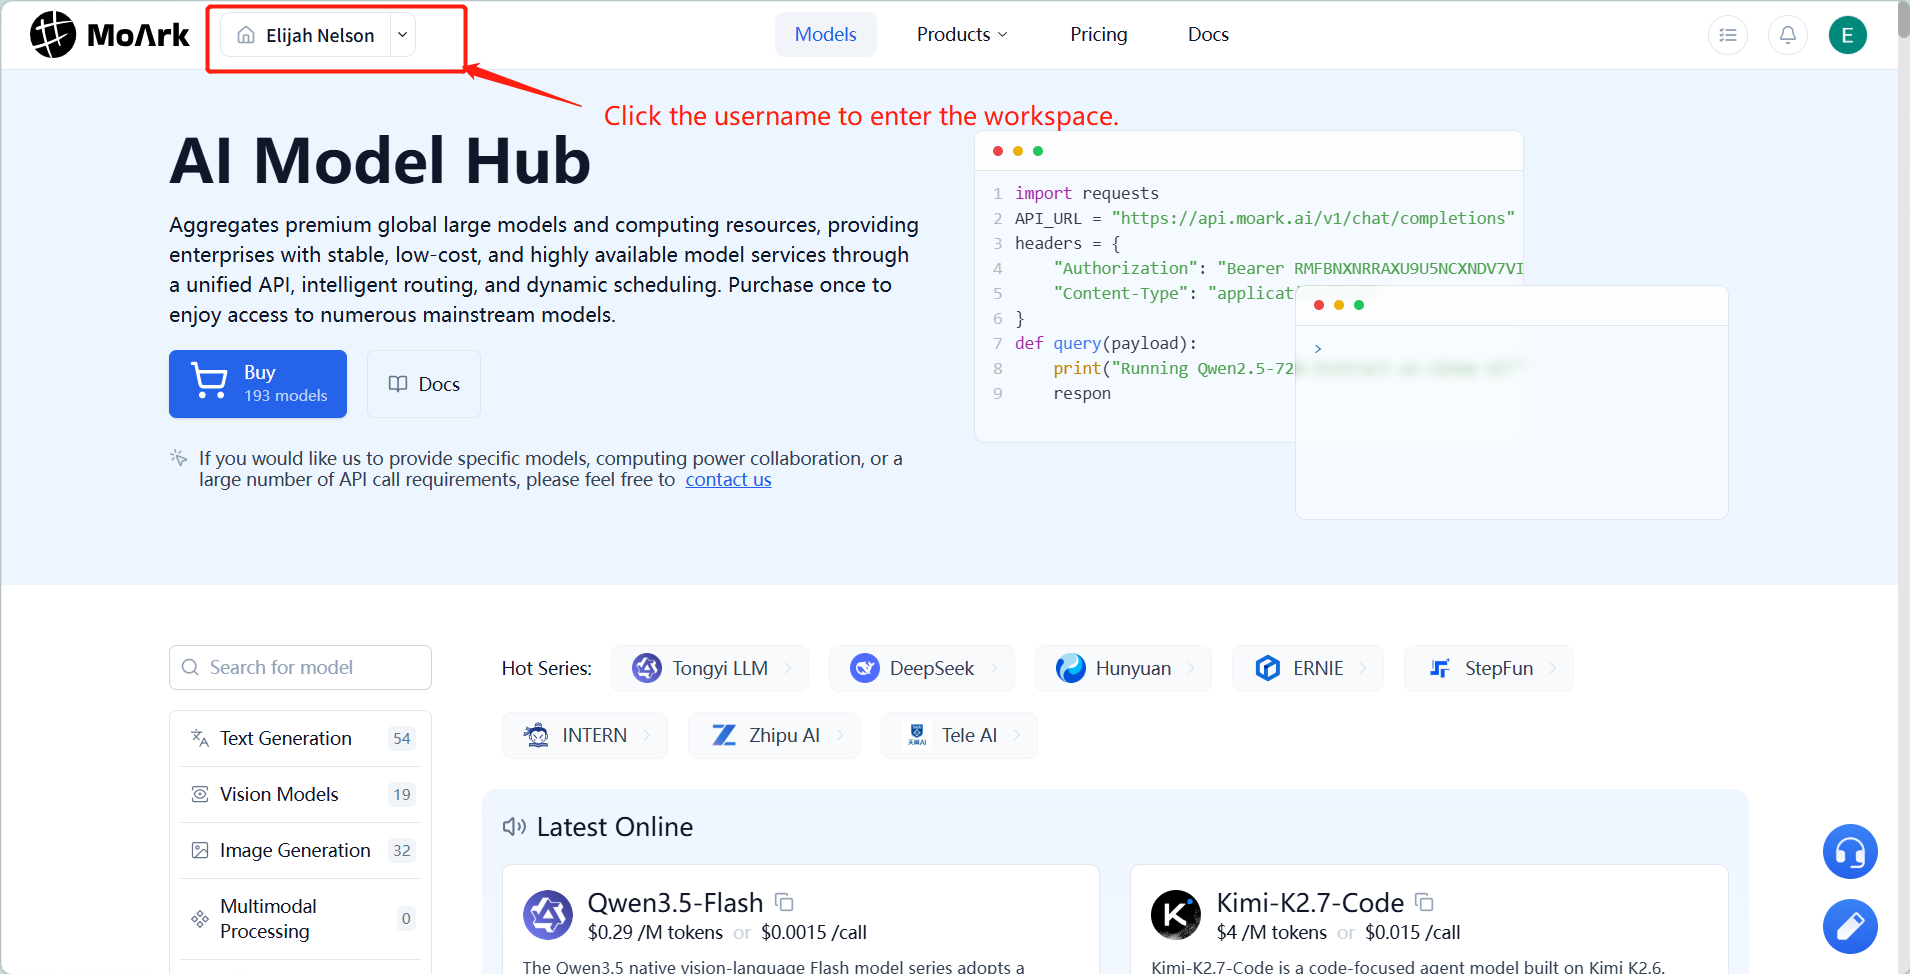
Keep the PocketClaw page open, open a new browser tab, visit MoArk, and click your username in the top-left corner to enter the dashboard.
2.2 Redeem Voucher
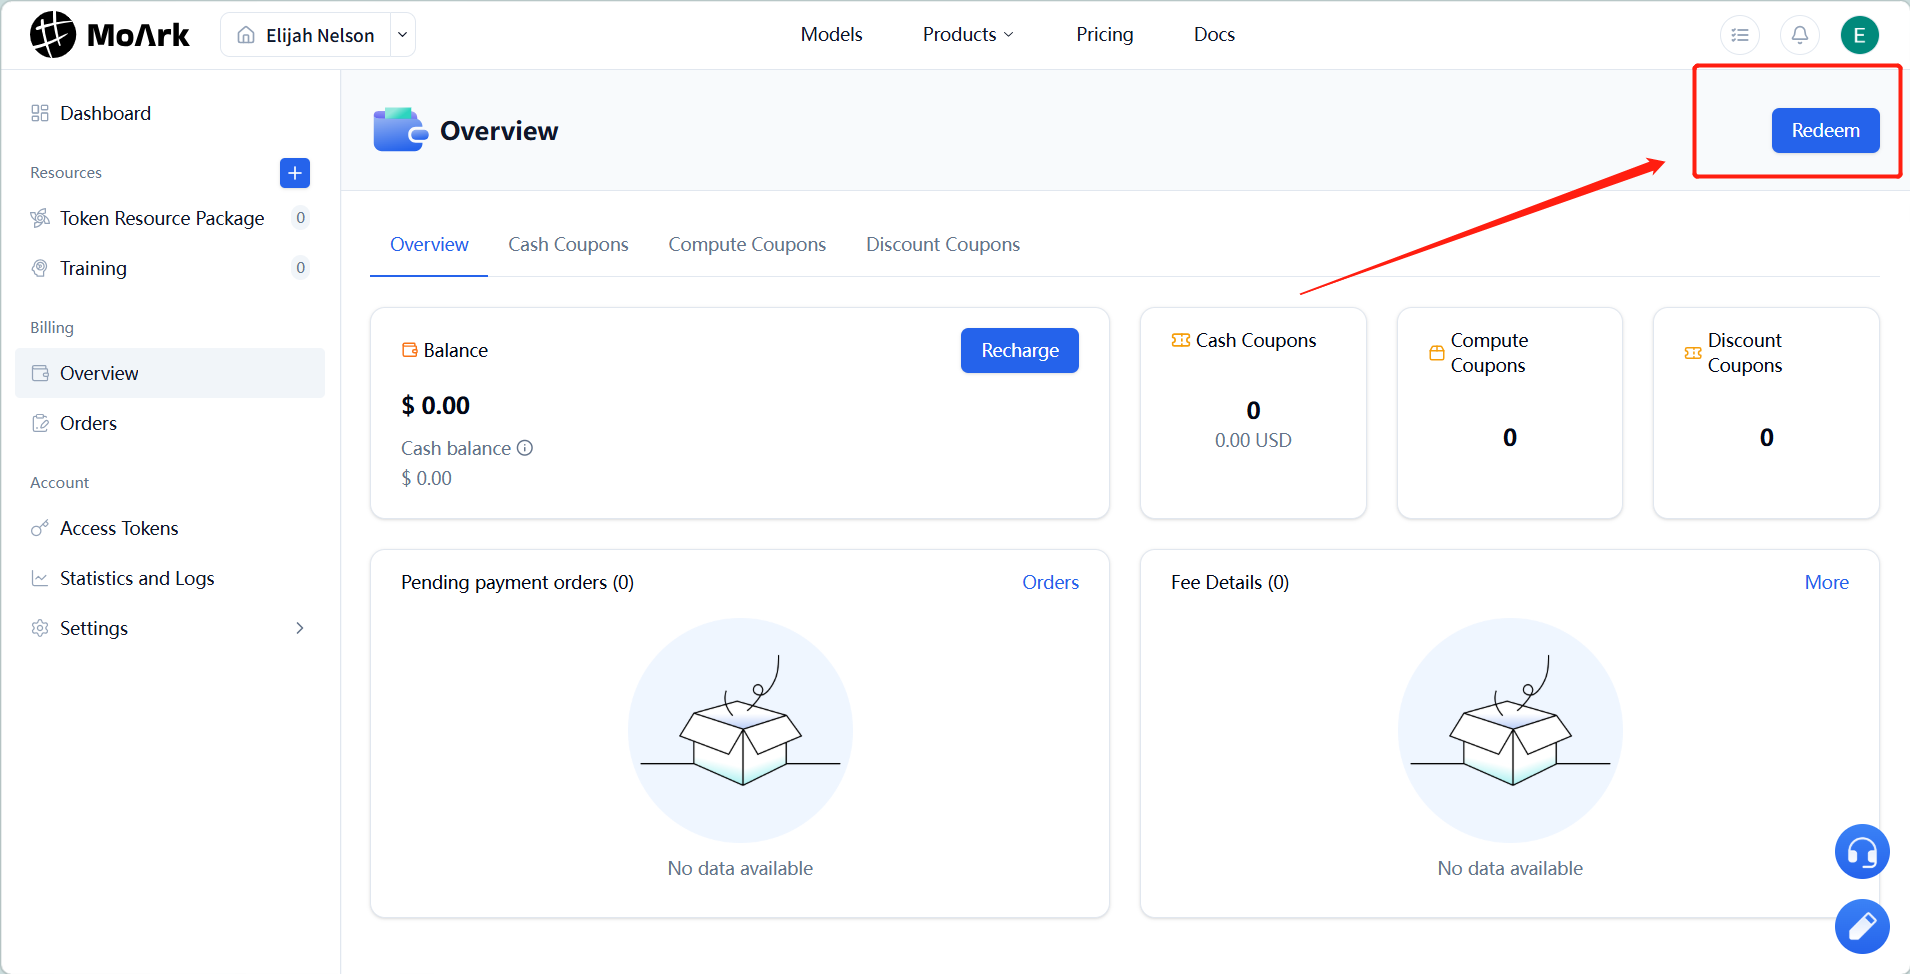
In the dashboard's left navigation bar, click "Billing Center", then click the "Redeem" button in the top-right corner.
| Enter Billing Center | Redeem Voucher |
|---|---|
 | 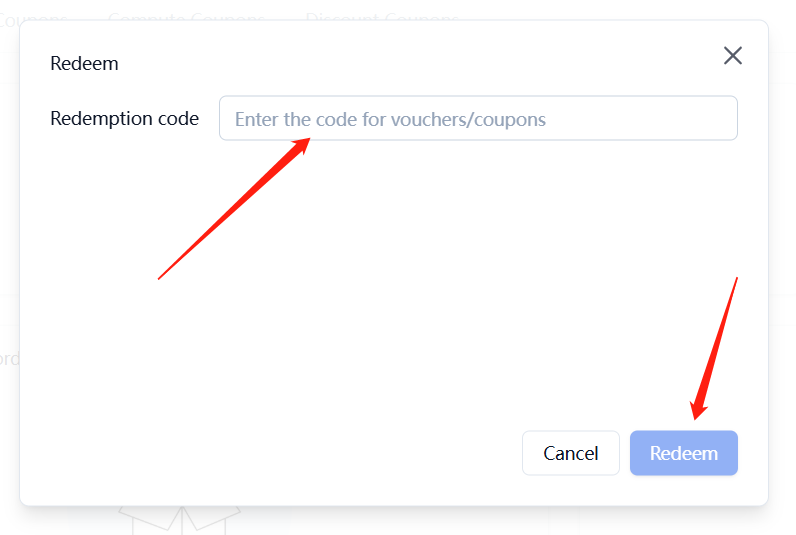 |
PocketClaw purchasers will receive a 200 CNY voucher via email. Please look out for an email from MoArk.
2.3 Create Access Token
-
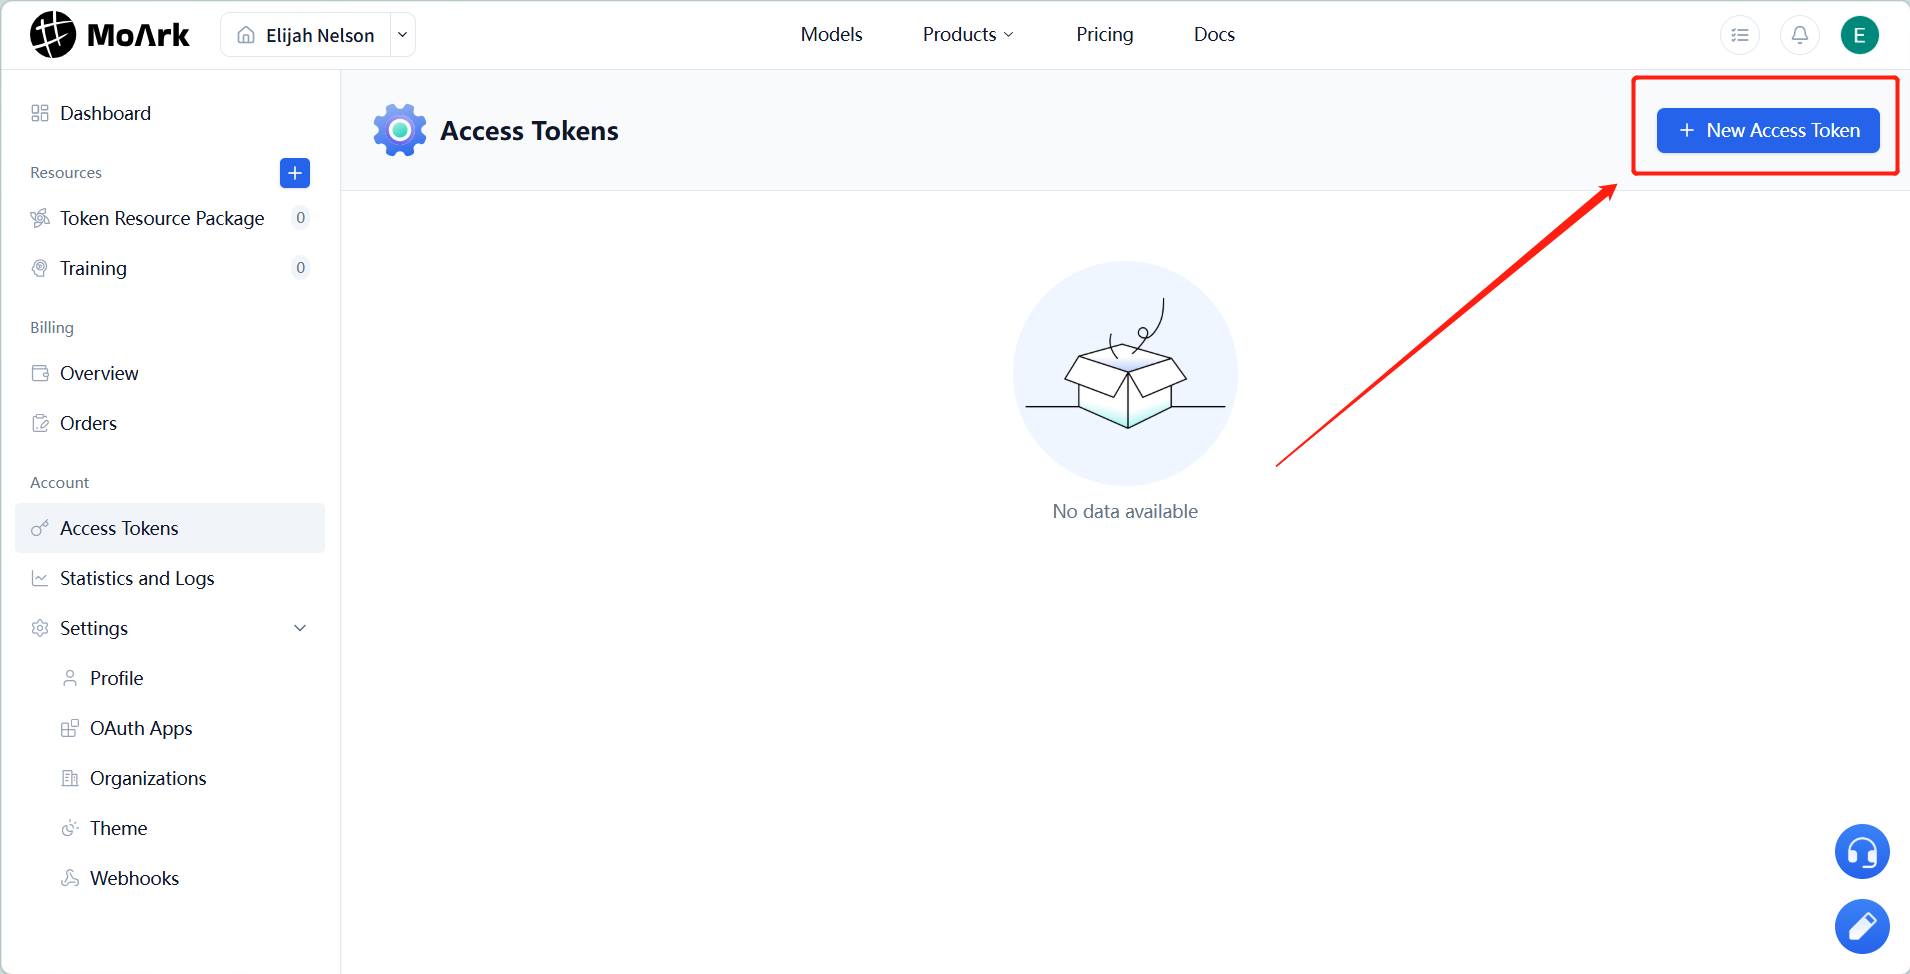
Go to the "Access Tokens" page and click "+ New Access Token" in the top-right corner
-
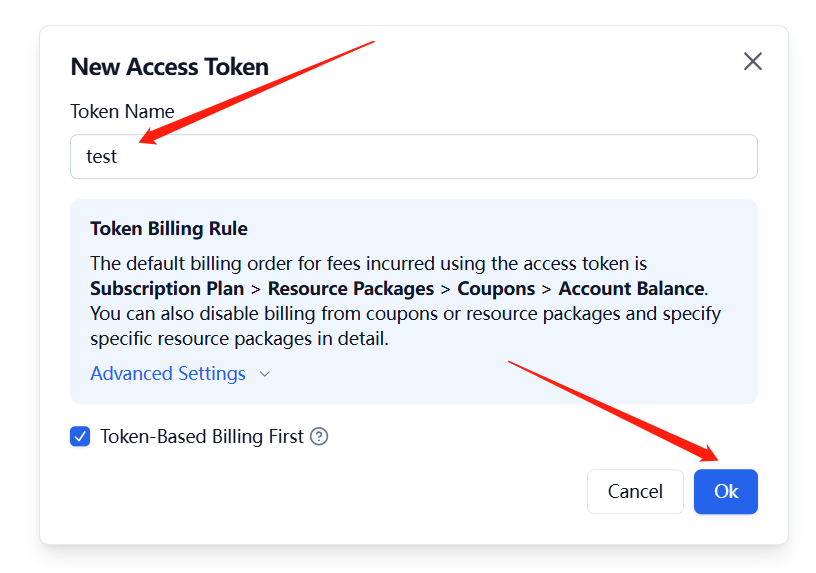
Enter a token name, the system will automatically select available resource packs, then click "Confirm"
-
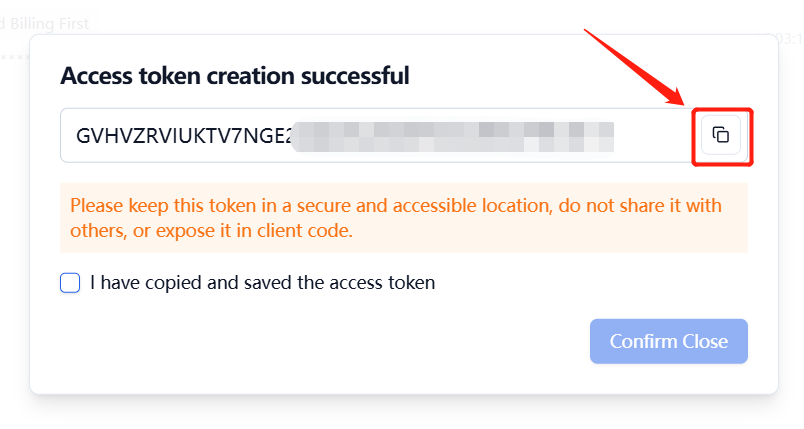
Copy the access token (you'll need to paste it into PocketClaw's configuration later)
Step 3: Complete the Beginner Wizard
3.1 Enter PocketClaw Main Interface
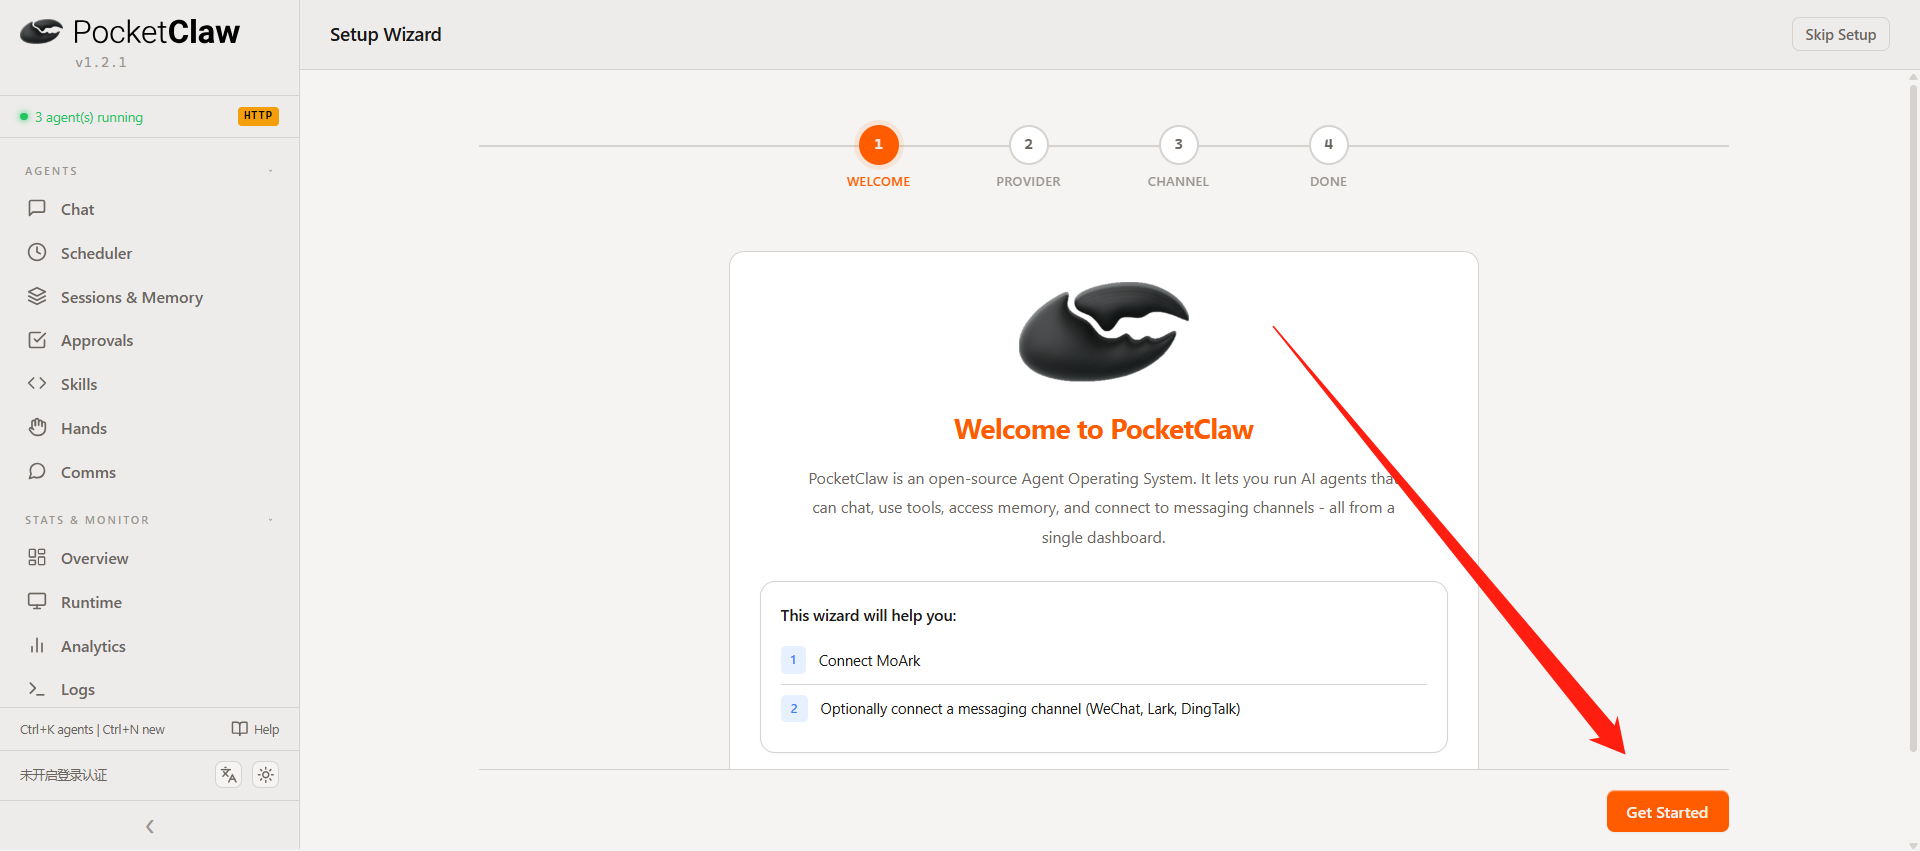
Return to the PocketClaw page you opened earlier (if closed, visit http://pocketclaw.local on the same WiFi network).
Click "Get Started" to enter the configuration page.
After PocketClaw connects to WiFi, any device on the same network can access http://pocketclaw.local to enter the main interface.
3.2 Configure Access Token
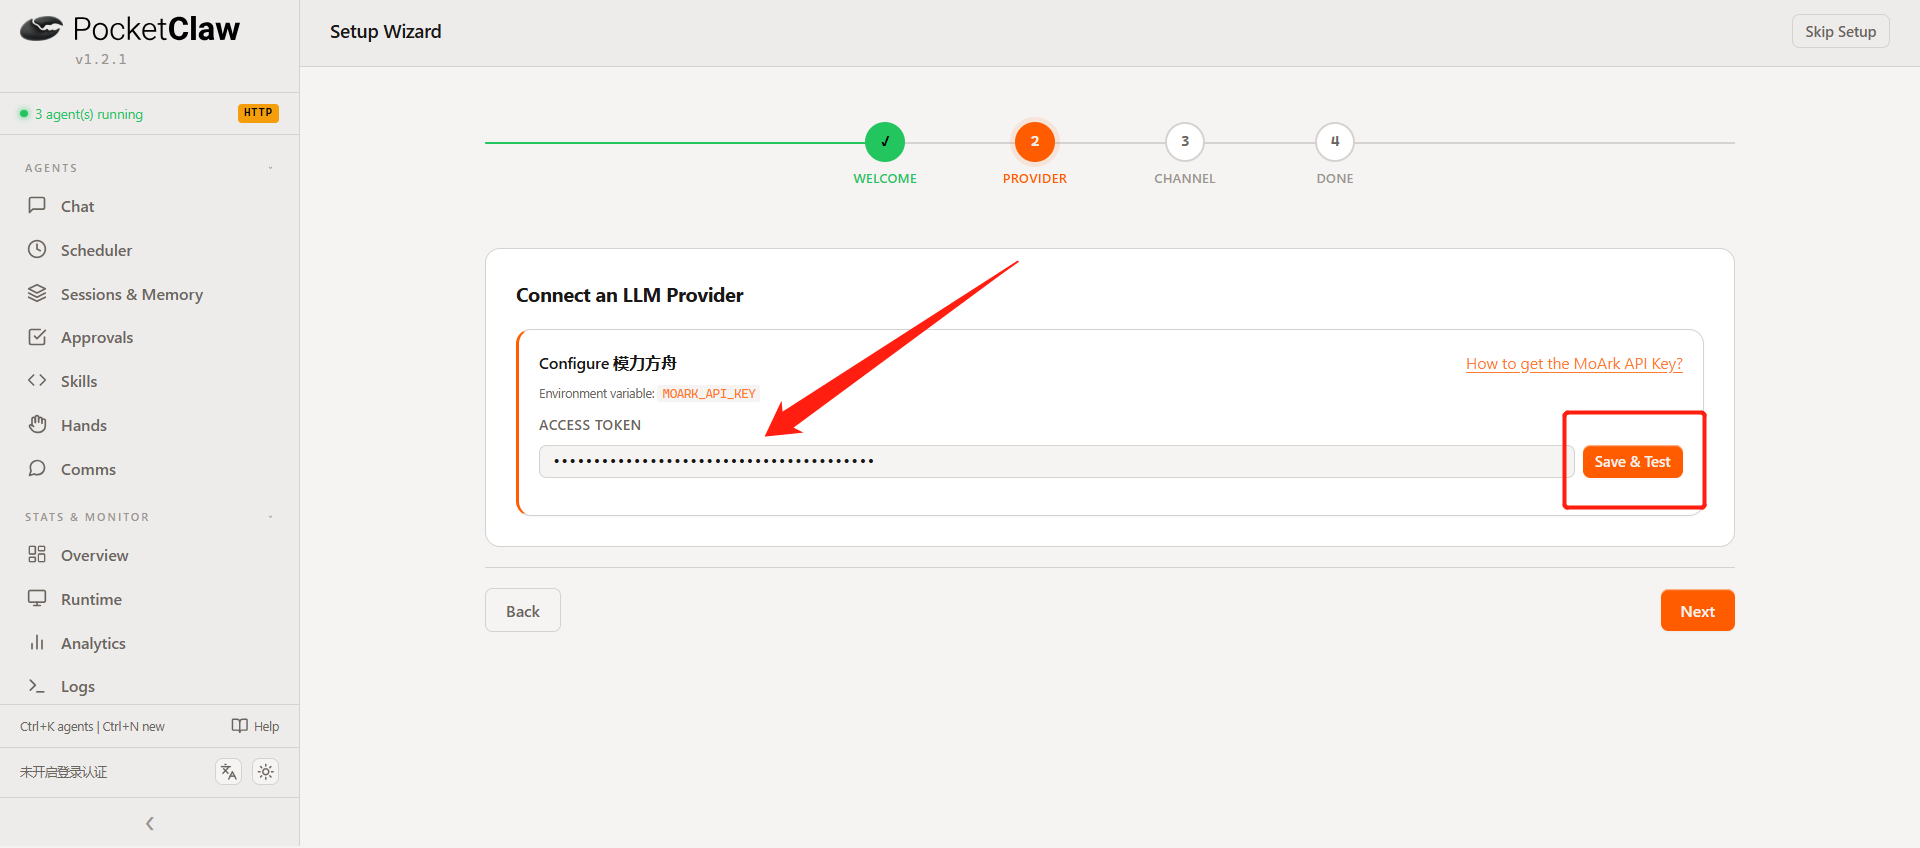
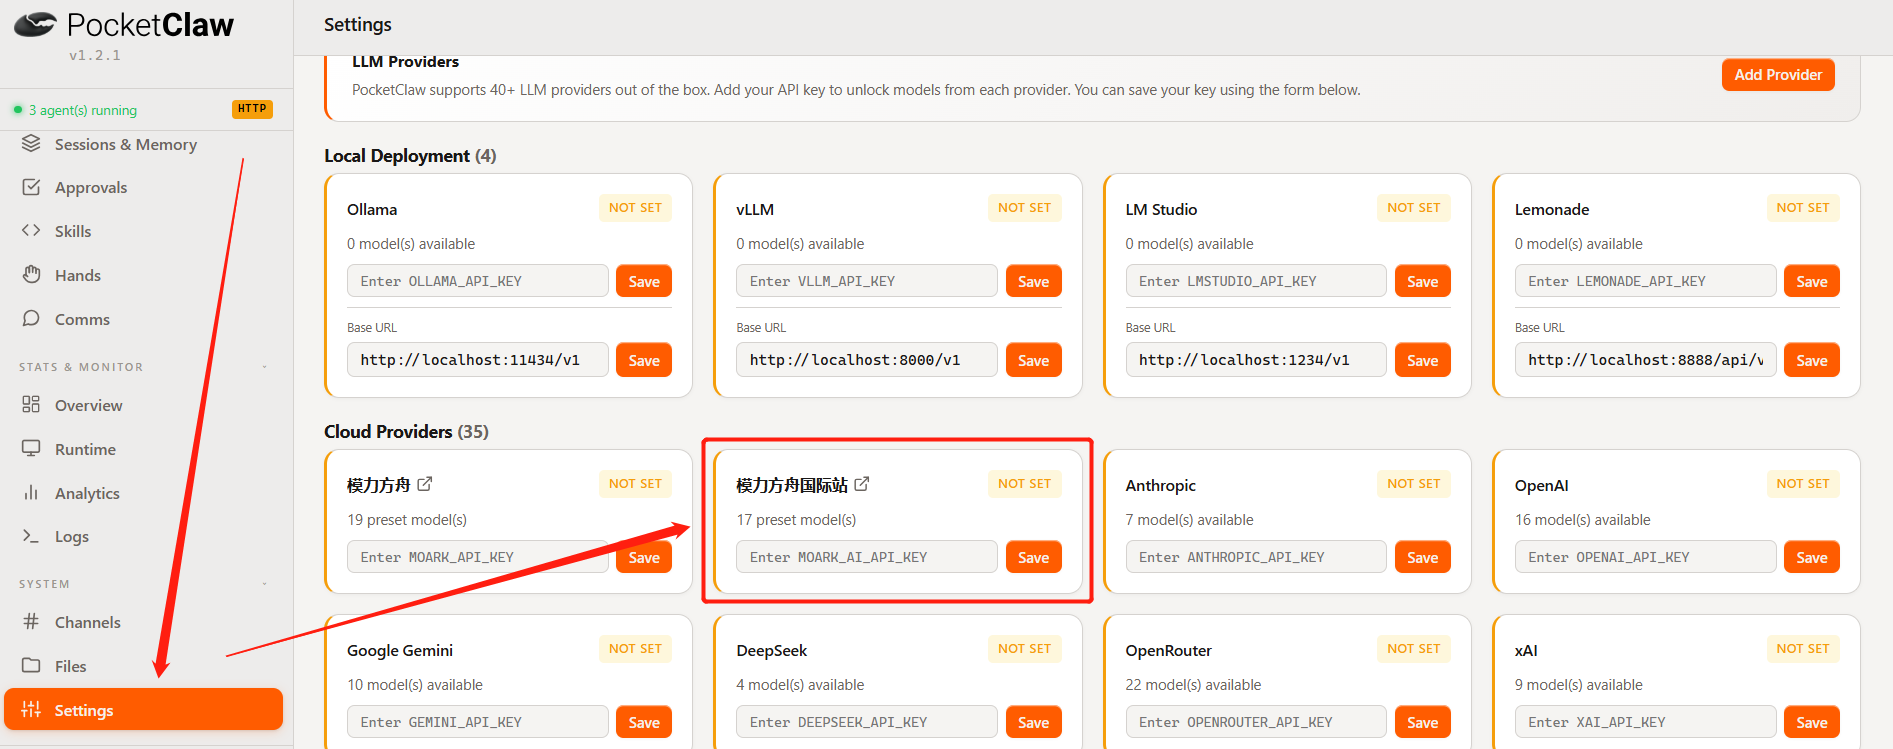
The PocketClaw setup wizard shows the Chinese mainland API endpoint by default. Fill in your access token according to your region:
Chinese mainland API KEY: Refer to the image below and paste the token directly into the access token text box.
Non-Chinese mainland regions (international site) API KEY: Refer to the image below and fill in the access token from the international site.
- Click "Save and Test" to complete validation
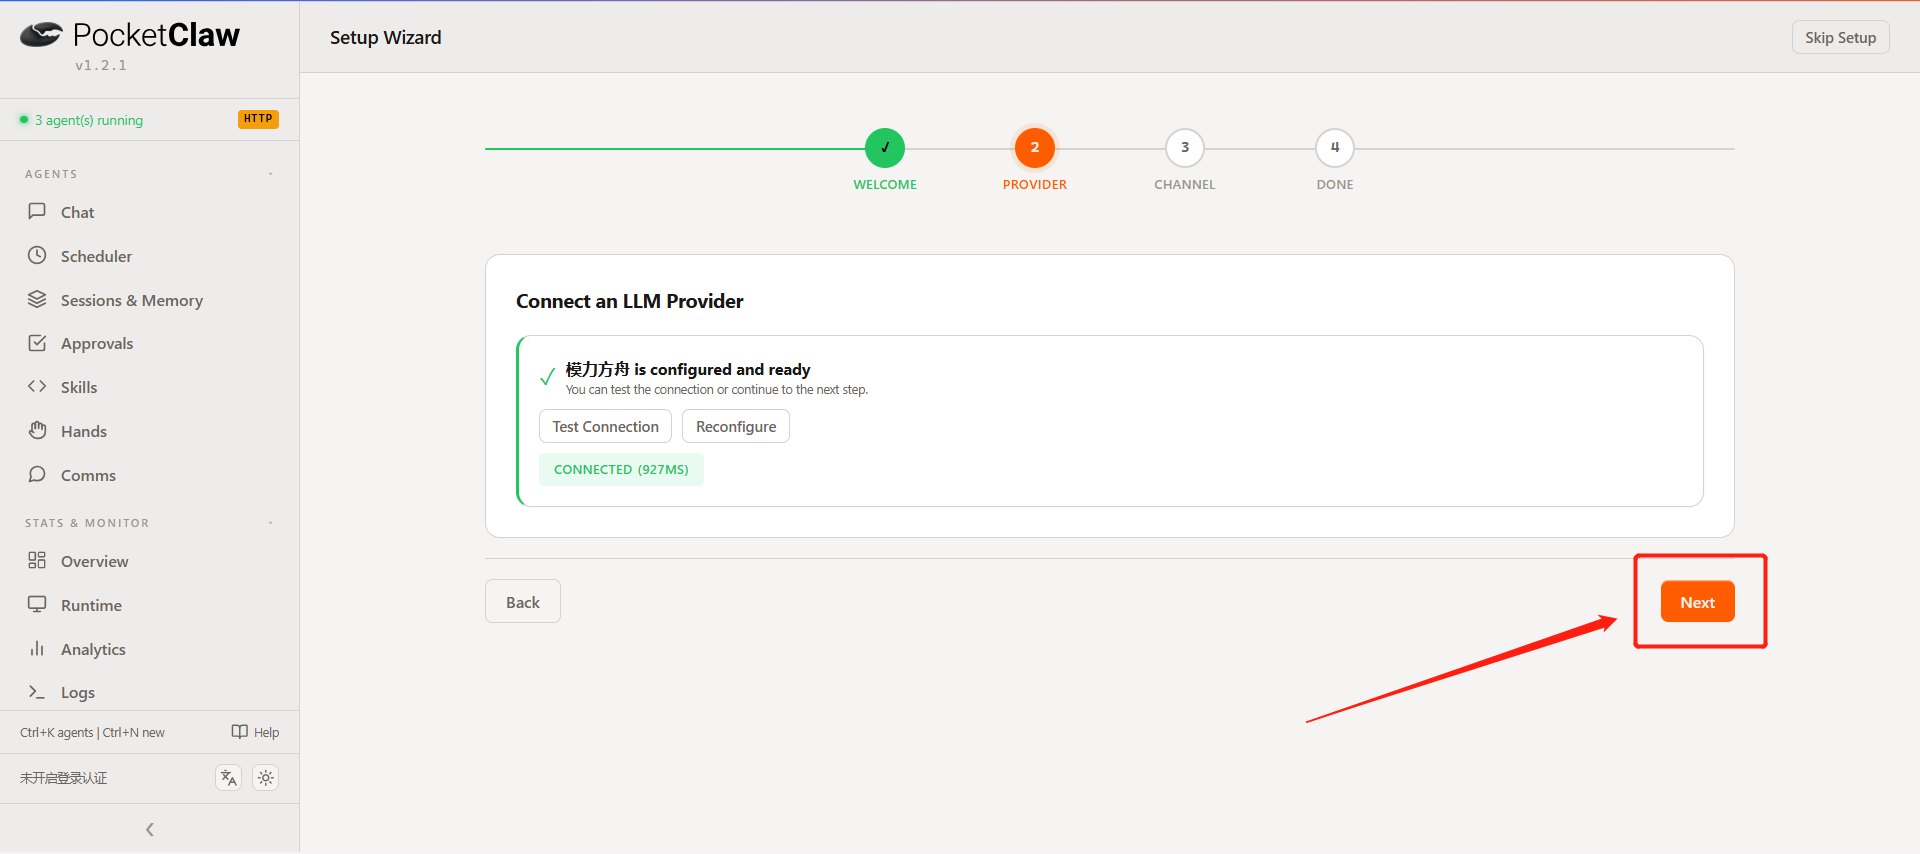
If prompted about insufficient balance, please return to the MoArk platform to confirm the voucher has been redeemed successfully, or that your account balance is sufficient.
-
After validation passes, it will automatically proceed to the next step
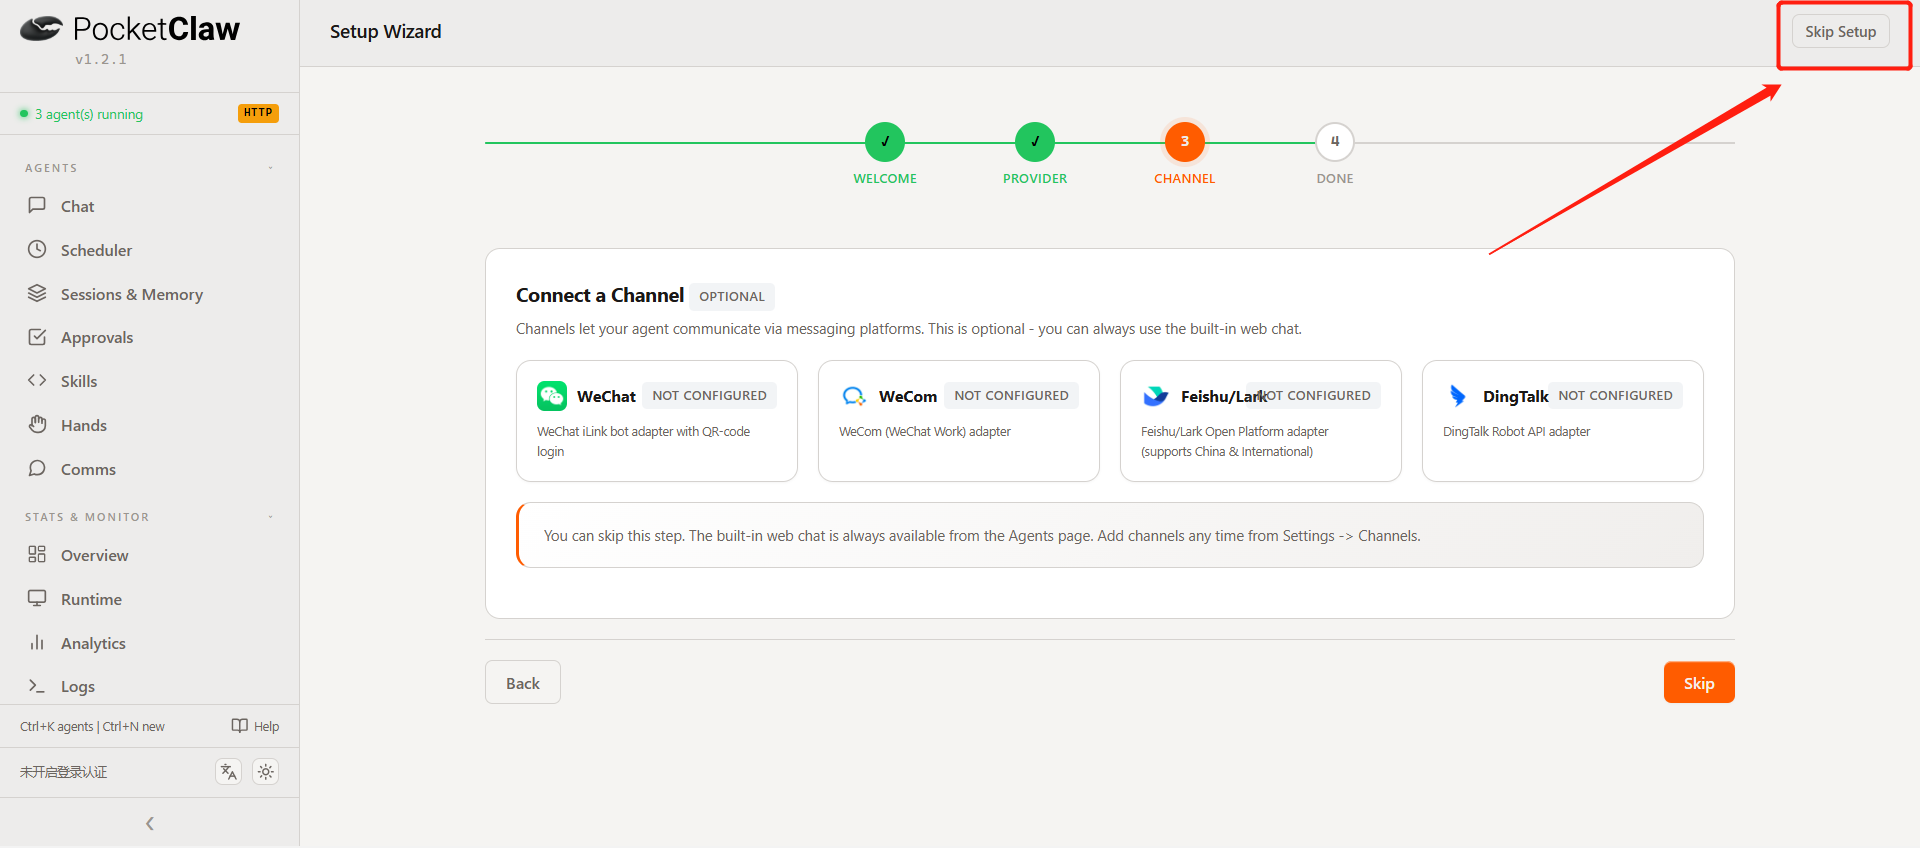
3.3 Configure Message Channels (Optional)
Channels allow your agents to communicate through mainstream messaging platforms. To save time, you can select "Skip" here.
If you need to configure this later, please refer to the relevant documentation.
- WeChat configuration
- WeCom configuration
- Feishu configuration
3.4 Configuration Complete
Review the configuration summary, then click "Start Chatting" to officially start using PocketClaw!
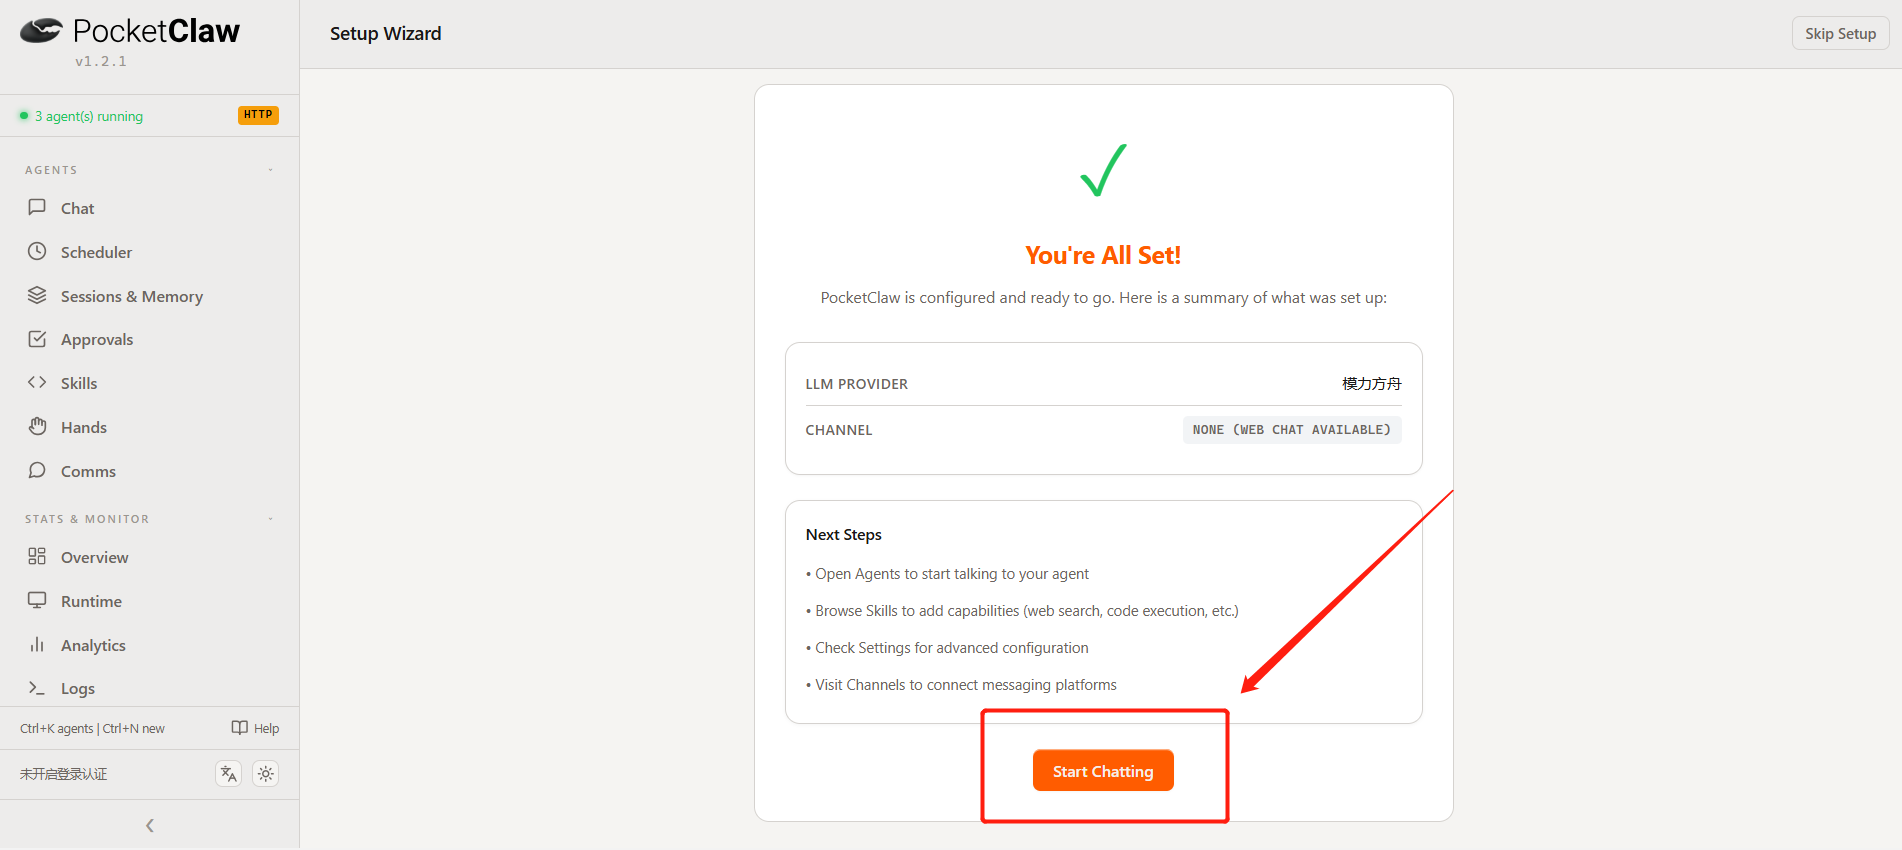
Start Chatting
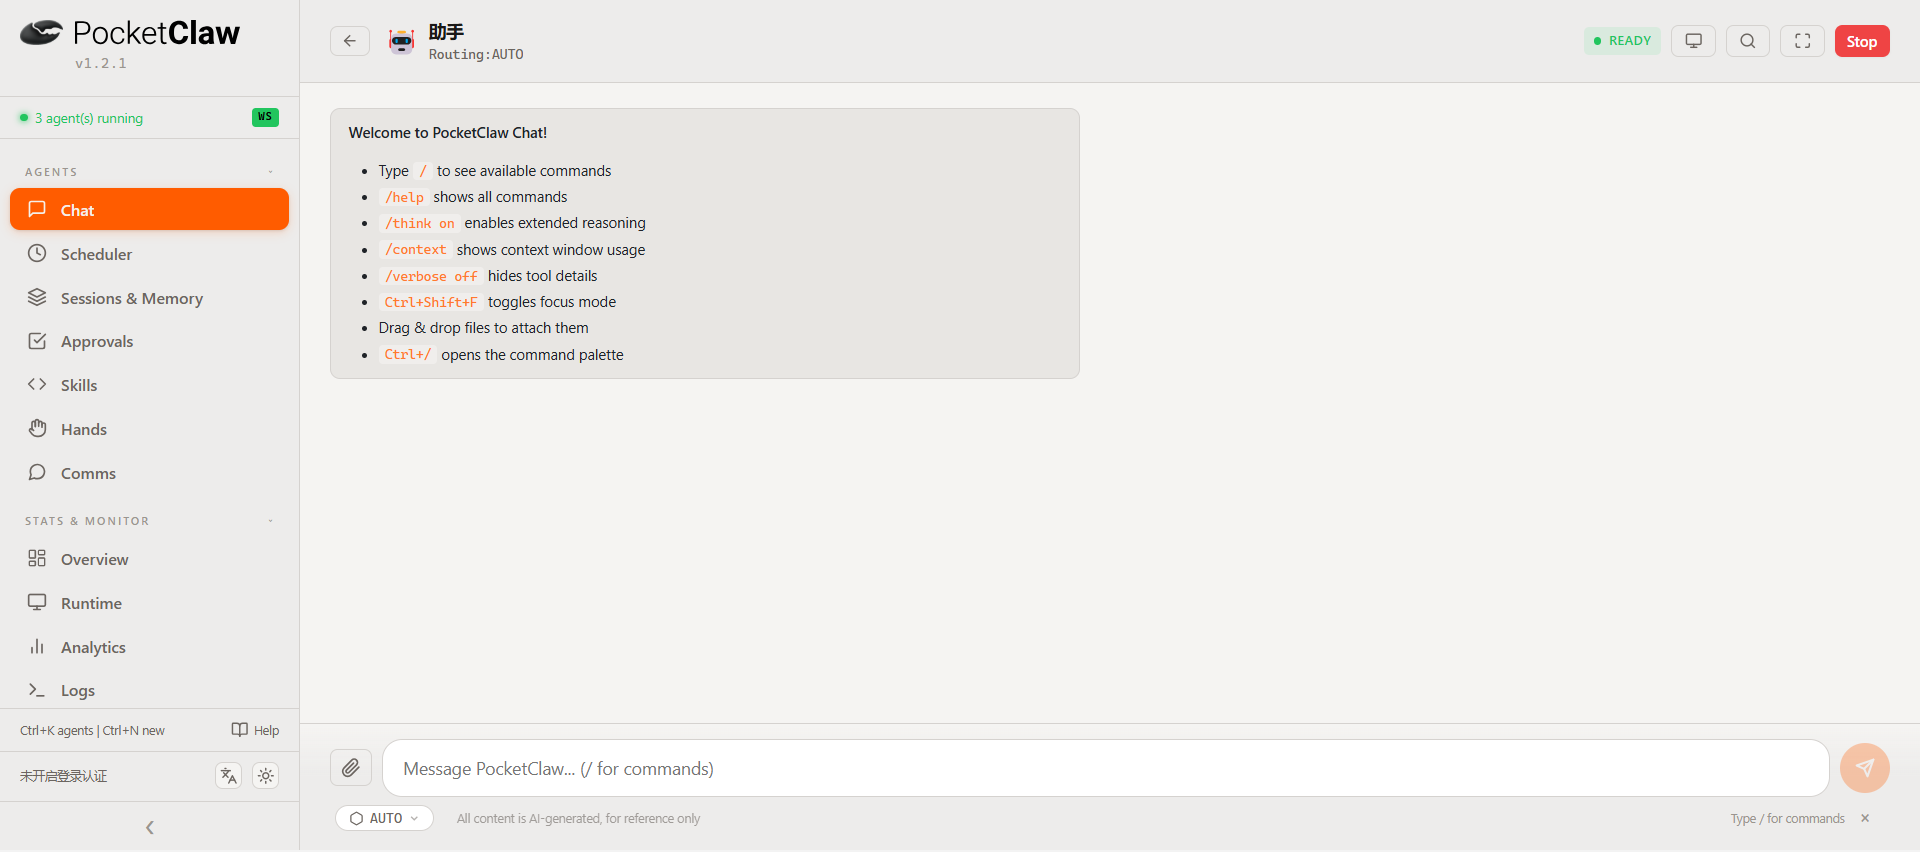
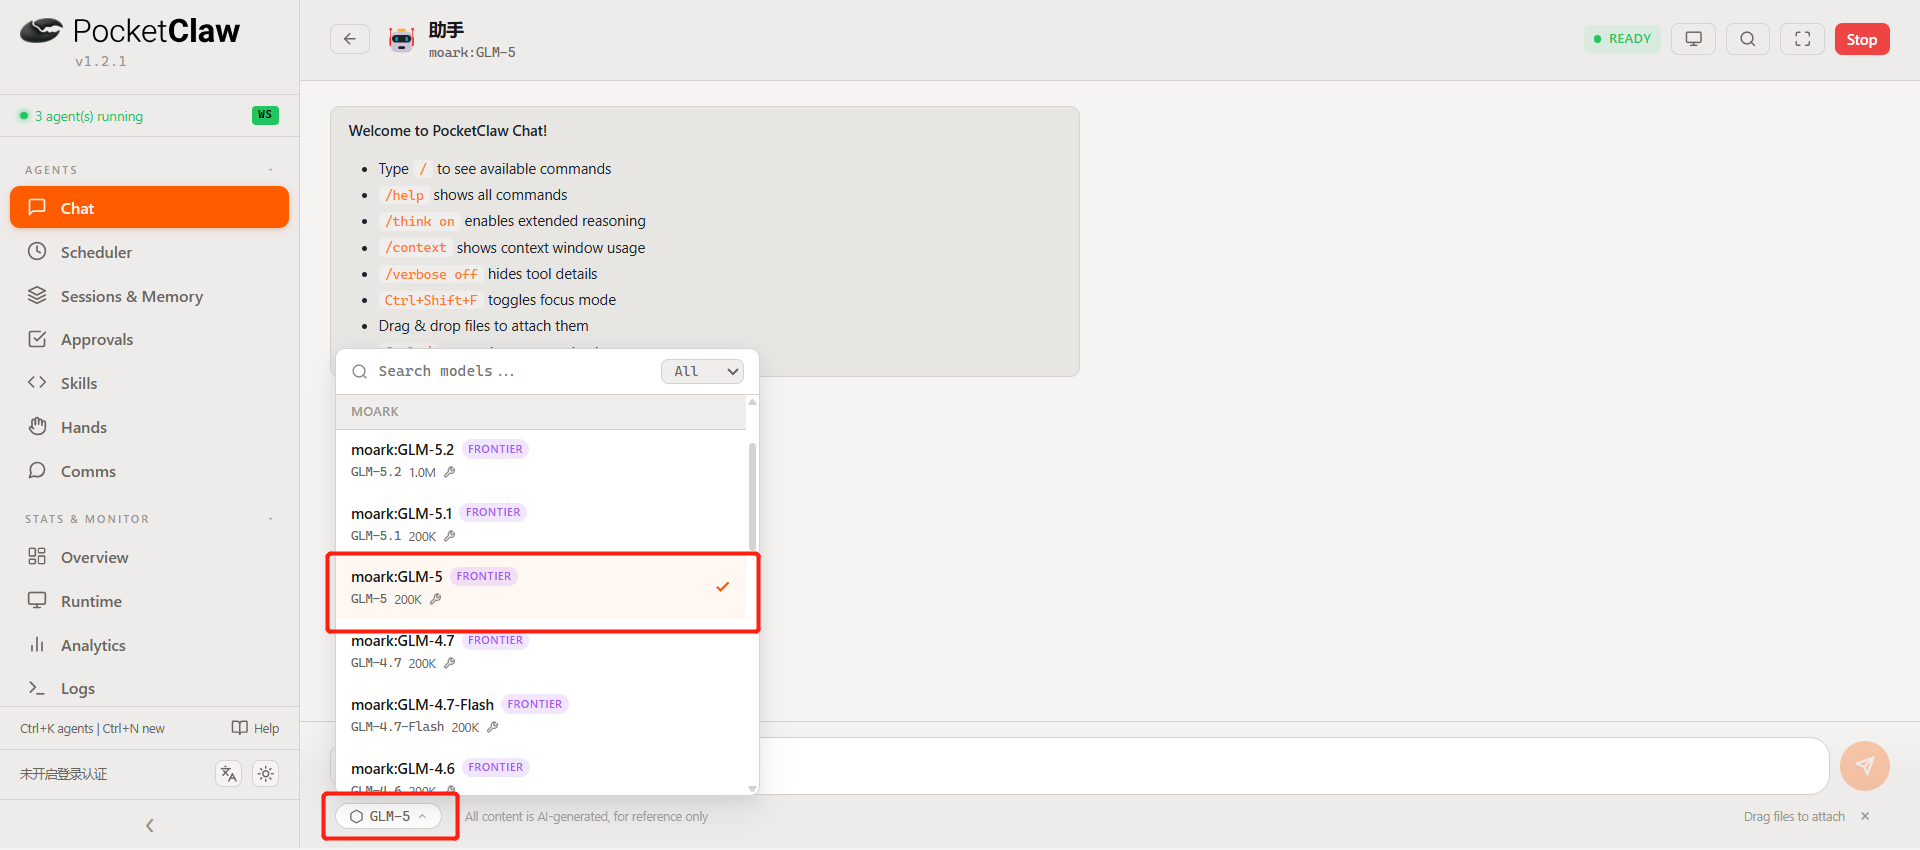
Click "Start Chatting" to enter the chat page. You can:
- Send messages and assign tasks to PocketClaw
- Click the config button to switch models (see image below)
| Enter Chat | Model Config Button |
|---|---|
 |  |
Say Hello
Try chatting with PocketClaw. If you see a reply like the one below, the configuration is successful!

You have completed the PocketClaw quick start setup. If you have any questions, feel free to contact customer support, or scan the QR code to join the official support group.
Official Community Group
If you encounter any issues while using PocketClaw, you can provide your PocketClaw purchase order to apply for joining the official exclusive community group. This group is dedicated to answering usage questions, configuration issues, and troubleshooting.

 京公网安备11011502039387号